How to Knit Cables: Step-by-Step Easy Beginner Guide
If you’ve admired the bold, twisted texture on a sweater and wondered how to knit cables, you’re about to learn one of the most rewarding knitting techniques. Cable knitting may look complex at first, but it’s built on a simple principle: temporarily holding stitches and changing their order to create movement in the fabric.
Once you understand this, learning to knit cables becomes structured, repeatable, and relaxing. This detailed knit cables tutorial explains everything step by step, from using a cable needle and crossing stitches to making a C6F or C6B cable with confidence.
Whether you are just starting cable knitting or want to improve at creating cable stitch patterns, by the end, you will know why cables twist and turn, how to fix any missteps, and how to add stunning cable designs to scarves, hats, and sweaters with confidence.
What Is Cable Knitting?
Cable knitting is a technique for creating twisted, braided, or rope-like patterns by moving stitches around on the needle. Instead of knitting stitches one after another, you cross one group of stitches over another. That crossing motion produces the signature raised texture we associate with cable sweaters, scarves, and hats.
In the past, cable patterns became famous in the traditional sweaters of the Aran Islands, where fishermen’s families used detailed cable designs to stand for ropes, strength, and family history. Today, cables are still one of the most well-known patterns in hand knitting.
Also Read: What Is a Cable Knit Sweater? Complete Guide: Best Tips
How to Knit Cables (Step-by-Step Guide)
Basically, how to knit cables comes down to one foundational principle: you move a group of stitches for a moment so other stitches can go over or under them. This crossing creates the raised, rope-like look known as a cable stitch.
In simple terms, learning how to knit cables means learning how to control stitch order. Every design, from a simple twist to a fancy braided panel, uses this same idea. Once you understand it, cable knitting for beginners makes sense and is not so scary.
The Basic Cable Knitting Structure
Here’s the exact process used in almost every knit cable tutorial:
- Knit to the cable section.
- Slip a specific number of stitches onto a cable needle.
- Hold those stitches in front (for a cable that leans left) or in back (for a cable that leans right).
- Knit the next stitches from your main needle.
- Knit the stitches from the cable needle.
- Continue working in pattern until the next cable row.
That crossing motion is what forms the cable twist. When people look up how to knit cable stitches, this is what they learn: moving stitches carefully so they cross each other.
Also Read: How to Cast on Knitting with Two Needles: A Complete Guide
Understanding Cable Direction (C6F vs C6B)
Before practicing how to knit cables step by step, understand this rule:
This simple logic applies across nearly every knitting cables pattern you’ll encounter.
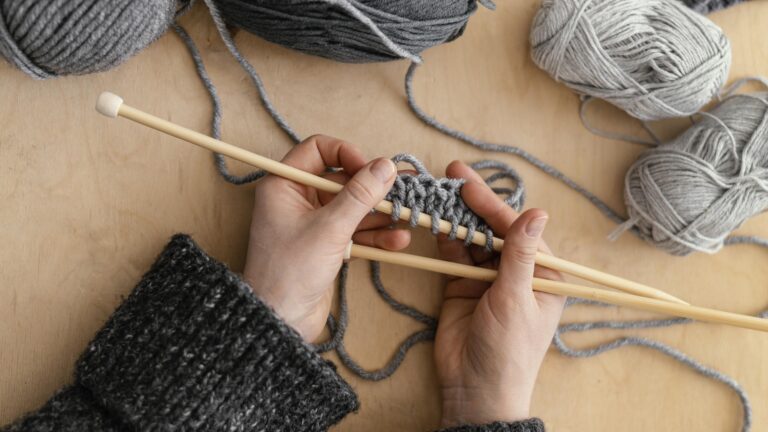
Practice Swatch: Beginner 6-Stitch Cable
To really understand how to knit cables, try making a small sample first. Start with 16 stitches (6 for the cable and the rest for the background).
Row 1 (Right Side): P2, K6, P2, K6, P2
Row 2 (Wrong Side): K2, P6, K2, P6, K2
Rows 3–5: Repeat Rows 1 and 2
Row 6 (Cable Row):
Repeat this sequence every 6th row. After you repeat this two or three times, you will see the twisted columns start to form. This is when cable knitting for beginners starts to feel easy instead of stiff.
Also Read: How to Knit a Gauge Swatch: Quick Guide
How Often Should You Twist?
In most patterns, cables are worked every 4–8 rows.
When learning how to knit cable stitch patterns, how far apart you place the twists can really change how it looks and feels.
Also Read: How to Count Rows in Knitting: A Complete Guide
Why This Method Works
The reason knitting cables seems hard at first is because of how they look, not because they are actually hard. You are simply changing the stitch position — not increasing, not decreasing, and not adding complexity. That is why learning how to knit cables is such a big step in knitting. Once you understand how it works, even hard cable patterns become easier to handle.
Materials and Tools for Cable Knitting
Before you fully master how to knit cables, using the right tools makes everything easier, tidier, and much less frustrating. Cable knitting does not need fancy equipment, but a few good choices will make a big difference, especially if you are new to cable knitting. Cables make the fabric a bit tighter, and crossing the stitches can be hard if your tools are not right.
1. Yarn: Choose Definition Over Texture
When learning how to knit cable stitch, stitch visibility matters more than softness.
Best yarn choices for cable knitting: smooth wool (excellent stitch memory), wool blends, light-colored worsted-weight yarn, and solid shades.
Avoid: highly fuzzy yarn (mohair, boucle), busy variegated colorways, and slippery silk-heavy blends for beginners.
Cables need clear lines and shape. The clearer the yarn, the more your cable pattern will show.
2. Knitting Needles: Size Matters
Cable knitting pulls stitches inward, which makes fabric slightly denser. For most projects, use the needle size recommended on your yarn label. If your cables look tight, go up half a size. If they look loose and sloppy, go down a size. Circular needles are great for practicing cable knitting on bigger projects like sweaters or scarves, even if you are not knitting in the round.
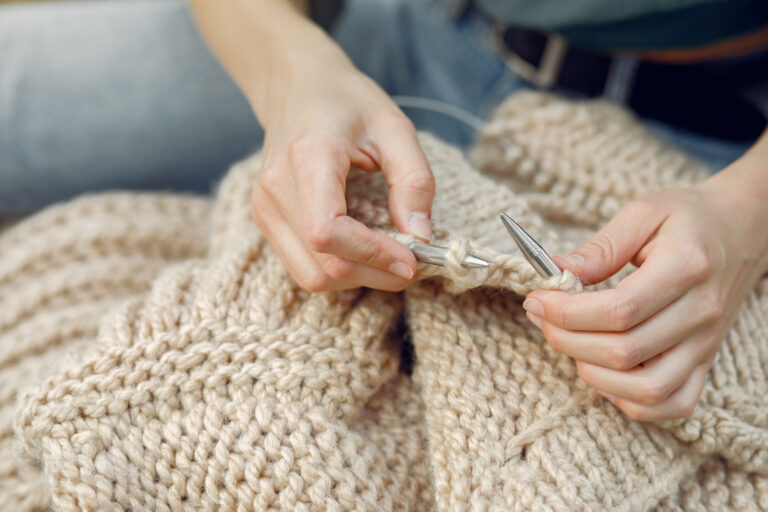
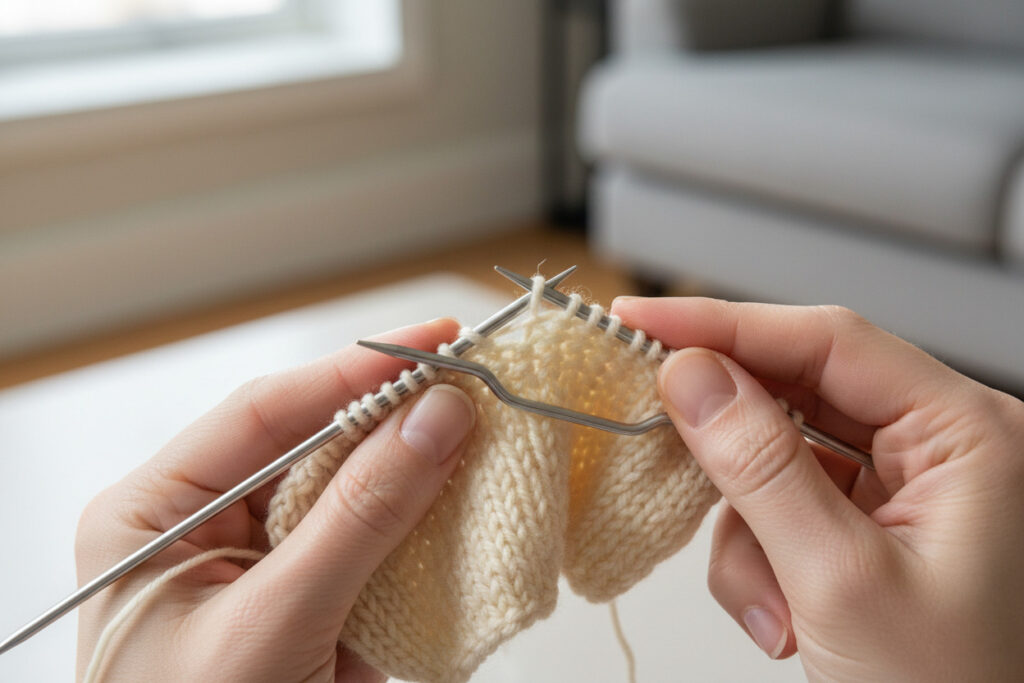
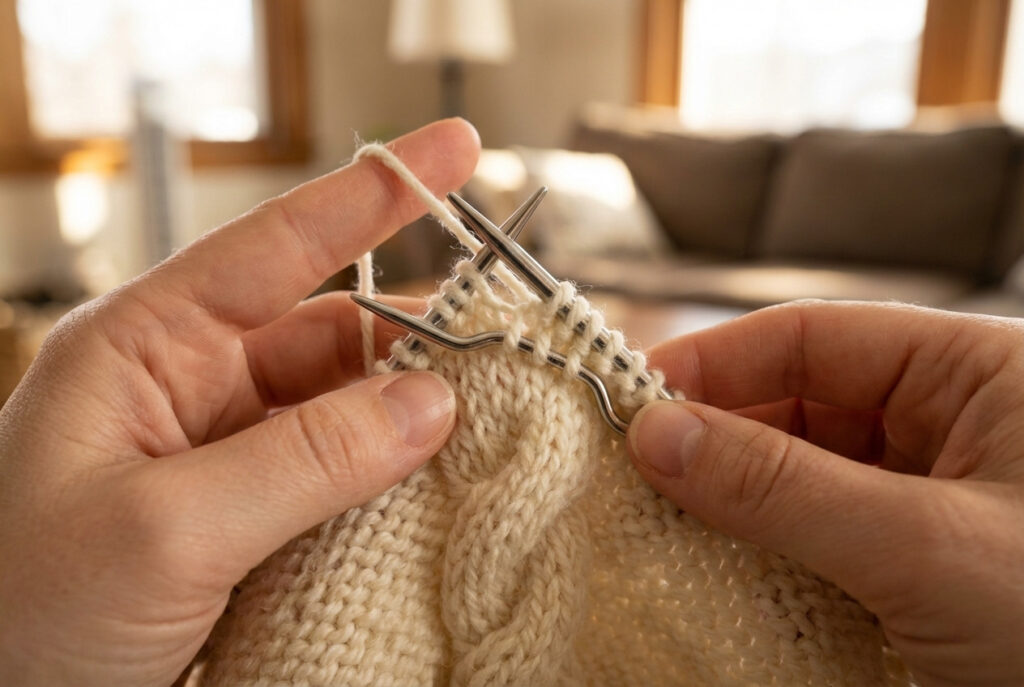
3. Cable Needle (Optional but Helpful)
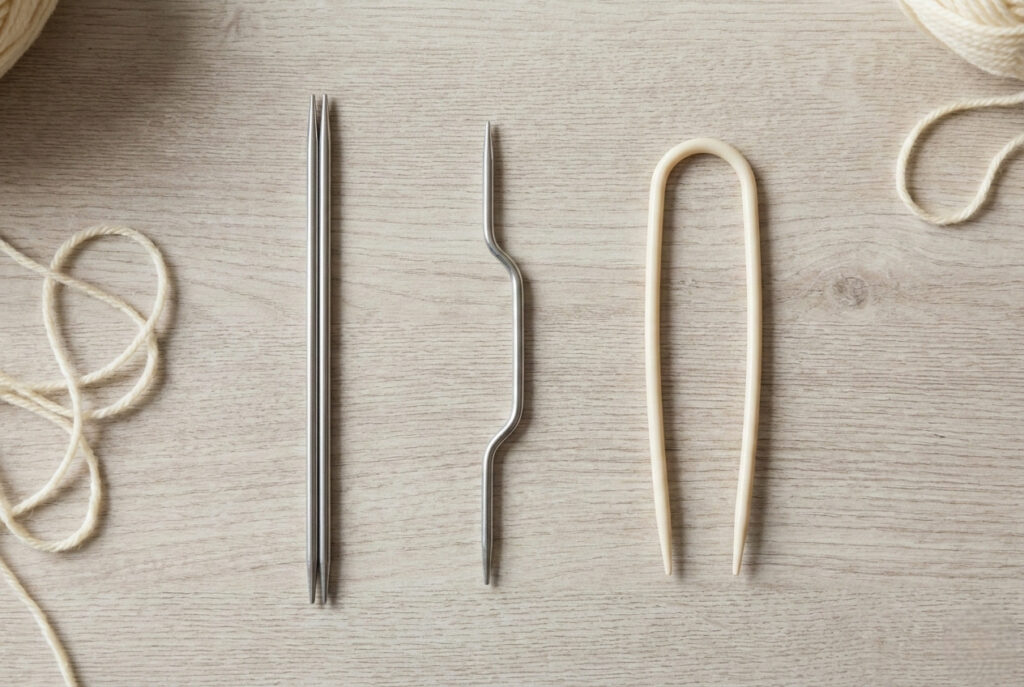
A cable needle is a small, pointed needle that temporarily holds stitches while you cross them. Types of cable needles include straight, curved (prevents slipping), and U-shaped holders. If you are learning cable knitting for the first time, a cable needle helps keep your stitches safe and your knitting even. Experienced knitters often do not use it, but learning to knit cables with a cable needle helps you feel steadier and more confident.
Also Read: The Best Interchangeable Knitting Needles
4. Stitch Markers
Stitch markers help identify cable panels, prevent miscounting, and keep pattern repeats aligned. When you are working on tricky cable patterns, markers help you make fewer mistakes and work faster.
5. Row Counter (Highly Recommended)
Cables are usually worked every 4–10 rows. A row counter prevents the classic mistake: “Was this the cable row or the knit row?” If you want neat, evenly spaced twists while learning cable knitting, counting your rows is very important.
6. Blocking Tools
Blocking makes your cables stand out much more. After finishing, lightly steam or wet block wool fibers and let the fabric dry flat. Blocking opens the background stitches and makes cables pop visually — especially in beginner cable knitting projects.
Also Read: How Do I Block a Knitted Sweater? Step-by-Step
Tool Summary
| Tool | Required? | Why It Matters |
|---|---|---|
| Yarn (smooth wool) | Yes | Shows cable definition clearly |
| Knitting needles | Yes | Controls tension and structure |
| Cable needle | Recommended | Secures held stitches |
| Stitch markers | Optional | Keeps panels organized |
| Row counter | Recommended | Prevents uneven cable spacing |
| Blocking tools | Optional | Enhances final texture |
Understanding Cable Direction (Front vs Back)
One of the most important foundations in how to knit cables is direction. Every cable twist leans either left or right, and that lean is controlled by one simple decision: where you hold the stitches.
When learning how to knit cable stitch, remember this rule: hold stitches in front → cable leans left. Hold stitches in back → cable leans right. That’s the core logic behind cable knitting.
Many beginners feel overwhelmed when starting cable knitting projects, but once you understand the direction, following any cable knitting tutorial becomes much easier. The twist is not random; it has a purpose.
Understanding Cable Abbreviations
Patterns use short forms to describe cable movements. If you’re serious about mastering how to knit cables, you must understand these abbreviations. Common cable terms include C6F (Cable 6 Front), C6B (Cable 6 Back), C4F (Cable 4 Front), and C4B (Cable 4 Back).
Here’s how to decode them: C = Cable, the number = total stitches involved, and F or B = hold stitches in Front or Back. For example, C6B means six stitches are involved in the cable, and the held stitches are positioned in the back to create a right-leaning twist. Knowing these abbreviations makes following any cable knitting pattern much easier.
Also Read: How to Read Knitting Patterns? Beginners Guide
Basic Right Cable (C6B) Instructions
A right-leaning cable, written as C6B, is one of the most common examples used when teaching how to knit cables.
What C6B Means
This step moves the first group of stitches behind the second group, making a right-crossing twist.
Step-by-Step C6B
- Knit to the cable section.
- Slip the next 3 stitches purlwise onto your cable needle.
- Hold the cable needle behind your work.
- Knit the next 3 stitches from the left needle.
- Knit the 3 stitches from the cable needle.
You’ve now completed the right cable. When practicing how to knit cable stitch, repeat this cable row every 6–8 rows. After a few repeats, you’ll clearly see the rope-like column forming. This technique is used in many sweater panels and in classic cable-knitting designs.
Left Cable (C6F) Tutorial
The left-leaning cable is the mirror image of C6B and is written as C6F.
What C6F Means
This step moves the first stitches forward, making a left-leaning twist.
Step-by-Step C6F
- Knit to the cable section.
- Slip the next 3 stitches onto your cable needle.
- Hold the cable needle in front of your work.
- Knit the next 3 stitches from the left needle.
- Knit the stitches from the cable needle.
That is the only real difference between C6F and C6B: front versus back. When learning how to knit cables, pay close attention to this placement. One misdirection can change the whole cable’s appearance.
How Often Should You Twist?
Cable rows are typically worked every 4 to 10 rows, depending on the pattern. For example: Row 1 (Knit), Row 2 (Purl), Row 3 (Knit), Row 4 (Purl), Row 5 (Cable twist). Fewer rows between twists create tighter, more compact cables. More rows create elongated, relaxed cables. In many cable knitting patterns, twists happen every 6 rows. This spacing keeps the cables clear without making the fabric too crowded, and it changes how the finished fabric feels and looks.
Reading Cable Charts
If you want full confidence in how to knit cables, learning to read charts is essential. Written instructions are helpful, but charts give you a picture of how the stitches move.
Cable Chart Basics
Charts let you see the entire cable panel at once, helping you make fewer mistakes. For people who learn by seeing, charts are often quicker and easier to use than written instructions.
Also Read: How to Pick Up Knit Stitches In Knitting? Two Methods
Why This Structure Works
Every cable, simple or complex, follows the same basic steps: separate stitches, hold stitches, cross stitches, resume pattern. You are not increasing stitches, not decreasing stitches — you are simply reordering them. Once you understand this, knitting cables no longer feels scary. Instead, it feels easy to control and even relaxing.
Cable Patterns for Beginners (Scarf, Hat & Swatch Projects)
Once you know how to knit cables, the quickest way to feel confident is by making easy projects you can repeat. Small cable knitting projects help you practice crossing stitches, keep your knitting even, and get better at following patterns. If you’re practicing cable knitting for beginners, start with projects that use one or two basic twists like C6B or C6F. These foundational cables appear in most knitting cables pattern designs, so mastering them early makes everything easier.
1. Beginner Cable Scarf
Flat knitting, a repetitive panel, easy stitch counting, and visible progress make the cable scarf an ideal starting point.
Simple Structure: Cast on 24 stitches. Knit 4, work a 6-stitch cable panel, knit 4, work another 6-stitch cable panel, knit 4. Make the cable twist every 6th row using C6F or C6B.
The purl background makes the cable stand out clearly. After 8 to 10 repeats, you will start to see the rope-like columns form evenly. This is one of the best ways to practice cable stitches without worrying about shaping.
Also Read: How Long Does It Take to Knit a Scarf? Time Guide
2. Simple Cable Hat
Knitting in the round means you do not have to do as many purl rows, which makes working cables easier.
Basic Structure: Ribbed brim (K2, P2) for 2 inches, then begin a centered cable panel. Work the cable twist every 6–8 rounds, then decrease gradually at the crown.
Hats teach you how to keep your cables lined up while shaping, which is an important step when learning to knit cables for clothes. Because the project is compact, mistakes are easier to fix and tension naturally eases.
Also Read: How to Knit a Hat with Straight Needles? Beginner’s Guide
3. Classic Cable Swatch (Highly Recommended)
Before starting bigger projects, knit a 6-by-6-inch cable sample. Swatching improves tension consistency, cable clarity, needle size accuracy, and yarn suitability. Cables make the fabric pull in, and without making a sample first, your finished projects can end up smaller than you expect. If you really want to get good at knitting cables, making a swatch is a must.
Common Cable Knitting Mistakes and How to Fix Them
Even experienced knitters make small mistakes when learning how to knit cables. The important thing is knowing how to fix them with confidence.
1. Cable Looks Too Tight
Cause: Pulling stitches too firmly when knitting from the cable needle.
Fix: Relax your grip slightly and avoid over-tightening after crossing. Cables naturally make the fabric tighter, and pulling too much makes them stiff.
2. Gaps Around the Cable
Cause: Loose stitches near the crossing point.
Fix: Gently snug the working yarn after completing the cable twist. Keeping your tension even gives you neat edges.
3. Cable Leaning the Wrong Direction
Cause: Holding stitches in front instead of back (or vice versa).
Fix: Remember the rule — front = left lean, back = right lean. Knowing which way your cables lean is very important when learning cable patterns.
4. Dropped Stitch in a Cable
Use a crochet hook to carefully pull the stitch back up. Go slowly to put the stitches back in the right order. Patience prevents full unraveling.
Also Read: How to Fix a Dropped Stitch: A Complete Guide for Knitters
FAQs: How to Knit Cables?
Conclusion: Mastering How to Knit Cables with Confidence
Learning how to knit cables is a milestone in knitting skill development. While cables may appear intricate, their structure is built on one foundational principle: temporarily reordering stitches to create movement and texture. You are not adding complexity — you are controlling stitch direction.
Once that concept becomes clear, cable knitting transitions from intimidating to empowering. From simple C6F and C6B twists to braided panels and textured sweater fronts, every cable pattern follows the same logical crossing method. With proper tension, good yarn selection, and consistent row spacing, your cables will look clean, defined, and professional.
The difference between following a pattern and mastering the technique lies in understanding why cables twist the way they do. When you understand structure, you gain control. And when you gain control, you gain creative freedom.
Start with a swatch. Practice direction. Build consistency. Soon, cable knitting will no longer feel like an advanced technique — it will feel like one of your most reliable skills.
Also Read: Top 10 Best Knitting Patterns for Beginners: Easy Guide