What Is Edge Stitch in Knitting? Easy Guide
Edge stitch knitting is a foundational technique that determines the quality and durability of a finished piece. While it rarely receives the attention given to decorative stitches, how edges are handled directly affects structure, alignment, and appearance. Clean sides on a scarf, smooth seams on a sweater, and fabric that resists curling all result from well-executed edge stitches.
What is edge stitch in knitting? It refers to the intentional stitches worked along the outermost edges of a flat-knit project. These stitches, commonly called selvage or selvedge stitches, form a stable framework that supports the fabric. They help maintain even tension, improve stitch definition, and create reliable borders for seaming or picking up stitches during finishing.
This guide offers a clear, in-depth explanation of edge stitch knitting from both technical and practical perspectives. You’ll gain a solid understanding of why edge stitches are essential, how different techniques influence fabric behavior, and when to use each method for the best results.
Whether you are building foundational skills or refining advanced garment construction, mastering edge stitches is a critical step toward consistently professional knitting outcomes.
What Is Edge Stitch in Knitting?
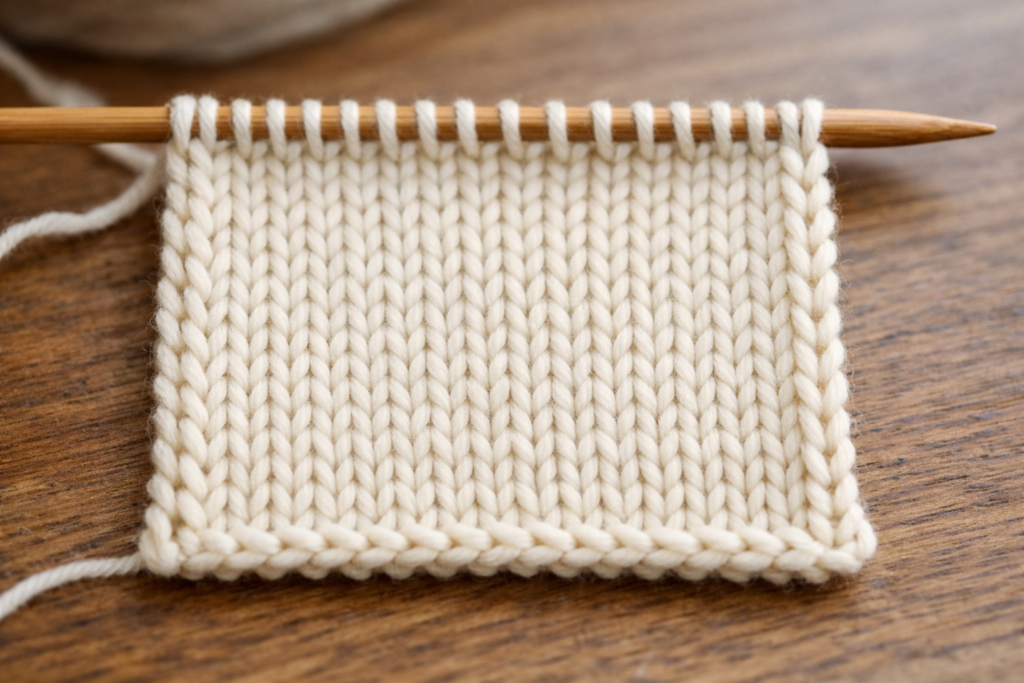
An edge stitch in knitting is a stitch, or a small group of stitches, intentionally worked at the beginning and end of each row in flat knitting. These stitches form the vertical borders of the fabric and act as a structural framework that supports the main stitch pattern.
Unlike decorative stitches that add texture or visual interest, edge stitches focus on control and stability. When worked consistently, they help the fabric behave predictably during knitting and finishing.
Key Functions of Well-Designed Edge Stitches
Well-designed edge stitches:
In most knitting patterns, edge stitches are kept separate from the decorative stitch count. They function quietly in the background, reinforcing the fabric so the central pattern remains balanced, aligned, and professional in appearance.
Also Read: How to Pick Up Knit Stitches In Knitting? Two Methods
Edge Stitch vs. Selvage Stitch: Is There a Difference?
In knitting resources, the terms edge stitch and selvage stitch are often used interchangeably—and in practical hand knitting, this overlap is entirely appropriate. Both describe stitches worked along the outer edges of flat fabric to create stable, well-defined borders.
Understanding the Technical Distinction
From a technical standpoint, there is a subtle distinction:
Edge stitch refers to the position—the outermost stitches at the beginning and end of a row.
Selvage (or selvedge) refers to the edge produced by those stitches once the fabric is worked.
In everyday knitting practice, however, the distinction is largely academic. Both terms describe controlled side stitches that strengthen edges, improve consistency, and support finishing techniques in flat-knit projects.
Why Use Edge Stitches? (Key Benefits)
At first glance, edge stitches may seem optional, especially in simple patterns. In reality, they play a critical role in shaping the structure, appearance, and longevity of a knitted piece.
1. Cleaner, More Professional Edges
Edge stitches encourage vertical alignment along the sides of the fabric, preventing the uneven stepping that can occur when stitches are left unmanaged. This is particularly important in stockinette stitch, which naturally curls and distorts at the edges.
2. Easier and More Accurate Seaming
Consistent edge stitches create clear visual and structural markers for joining pieces. Techniques such as mattress stitch rely on even, stable edges to produce seams that are nearly invisible from the right side.
3. Improved Durability
The edges of a knitted item experience more handling and stress than the interior. Reinforced edge stitches help maintain shape, reduce stretching, and slow wear over time.
4. Simpler Stitch Pickup
Finishing elements such as button bands, collars, and decorative borders often require picking up stitches along the edge. A well-defined edge ensures even spacing and minimizes guesswork during this process.
5. Better Pattern Control
Edge stitches act as a buffer between the main stitch pattern and the fabric’s boundary. This separation helps cables, lace motifs, and pattern repeats remain balanced and undistorted at the sides.
When Should You Use an Edge Stitch?
Edge stitch techniques are most beneficial in flat knitting, where side borders are exposed and functional.
Projects That Benefit Most from Edge Stitches
They are especially useful for:
Also Read: How Long Does It Take to Knit a Scarf? Time Guide
Projects worked entirely in the round typically do not require edge stitches, as there are no vertical side edges to stabilize.
5 Popular Edge Stitch Techniques
There is no single “best” edge stitch method in knitting. The most effective choice depends on yarn weight, stitch pattern, fabric behavior, and finishing requirements. Understanding how each technique influences tension, elasticity, and edge definition allows knitters to select the most appropriate selvage for a given project.
1. Slipped Stitch Edge (Classic Selvage)
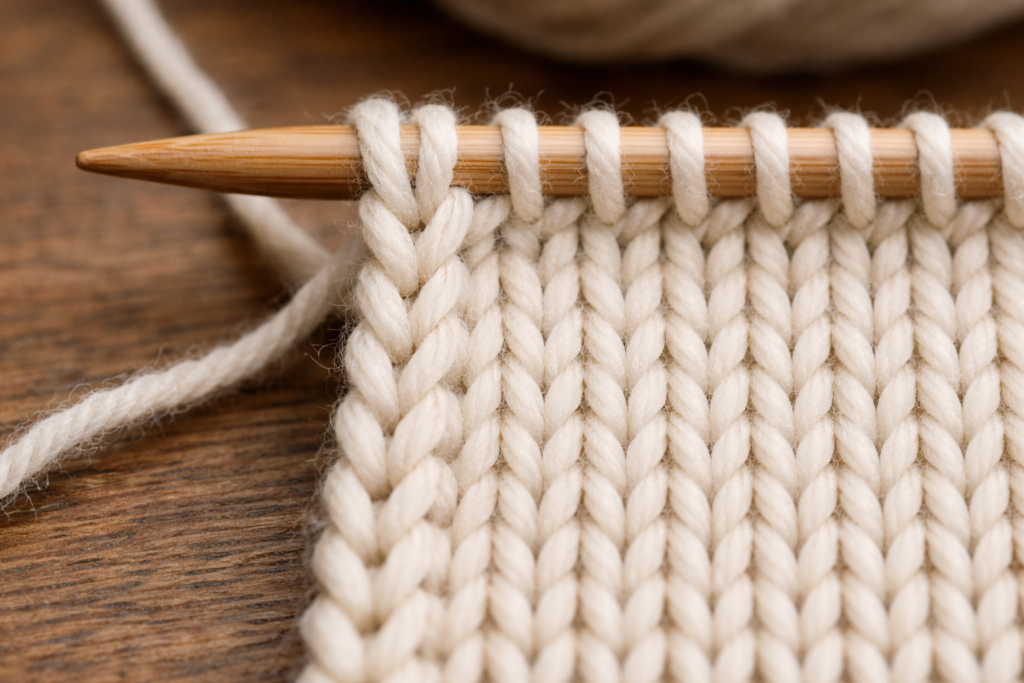
One of the most widely used edge stitch techniques, this method produces a clean, chain-like selvage that is both stable and visually consistent.
How It Works
Slip the first stitch of every row purlwise with the yarn held at the back of the work, then knit or purl the final stitch as required by the pattern. This controlled slip creates a linked chain structure along the edge.
Why Knitters Rely on It
Best For
Scarves, sweater panels, flat stockinette fabric, and garments requiring invisible seams
2. Garter Stitch Edge
In this technique, the edge stitches are worked in garter stitch regardless of the main pattern, creating a subtly textured, curl-resistant border.
How It Works
Knit the first and last stitch of every row, even when the body of the fabric is worked in stockinette or another pattern.
Advantages
Also Read: What is Garter Stitch in Knitting? Easy Knitting Explained
Best For
Blankets, scarves, dishcloths, and beginner-friendly projects
3. Slip-Knit Edge (Alternating Rows)
This variation blends decorative appeal with functional stability by alternating how the first stitch is treated on right-side and wrong-side rows.
How It Works
Result
A lightly braided or linked edge that offers more elasticity than a fully slipped selvage while retaining clean definition.
Best For
Projects that require both flexibility and polished edges, such as lightweight garments or accessories
4. Double Edge Stitch (Two-Stitch Border)
Instead of relying on a single stitch, this method reinforces the edge by working two dedicated border stitches on each side.
Benefits
Common Setup
Slip the first stitch, knit the second stitch at the beginning of the row; mirror this sequence at the end of the row. Variations may include garter or twisted stitches, depending on desired firmness.
Best For
Coats, blankets, structured garments, and wide panels
5. Decorative Edge Stitch Patterns
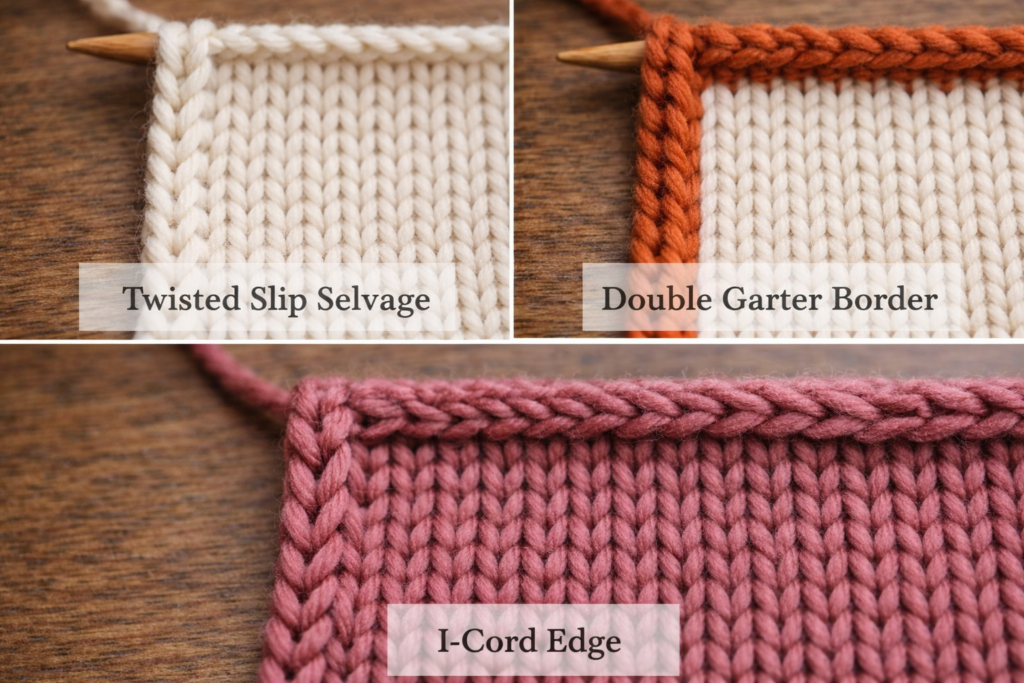
Some edge stitches are intentionally designed to be visible and decorative, forming part of the overall design rather than acting solely as support.
Examples Include
When to Use Them
Decorative edges should be chosen carefully, as they prioritize appearance over ease of construction.
Best Edge Stitch Techniques by Project Type
Choosing the right edge stitch depends largely on how the finished piece will be used and finished.
For Scarves
A slipped-stitch edge or a simple garter-stitch edge works best. Both methods create clean, even sides that remain flexible and visually balanced without distracting from the main stitch pattern.
For Sweater Panels
A classic slipped stitch selvage is the most reliable option. This technique produces a stable, chain-like edge that aligns neatly during seaming, making it ideal for garments assembled from flat pieces.
Also Read: How to Style a Cable Knit Sweater: Easy Guide 5 Tips
For Blanket Squares
Garter stitch edges or reinforced double-edge stitches provide the necessary structure. These methods help prevent stretching over time and keep large pieces lying flat, even after repeated use and washing.
For Lace Knitting
A simple slipped edge is often preferred. It supports the delicate pattern while preventing edge distortion, keeping lace motifs open and well-defined, free from interference from decorative borders.
For Button Bands and Plackets
Reinforced multi-stitch edges or i-cord–style finishes offer the best results. These techniques create firm, durable edges that hold their shape, support closures, and contribute to a polished, professional finish.
Also Read: How to Add Stitches When Knitting: A Complete Guide
Step-by-Step Edge Stitch Tutorial (Beginner-Friendly)
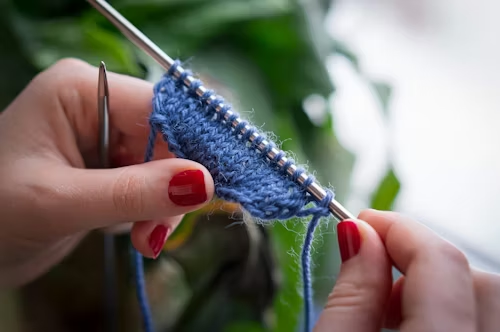
If you are new to edge stitch knitting, the most effective approach is to start with a simple, reliable method. A basic slipped-edge stitch creates clean borders, improves tension control, and lays the groundwork for more advanced selvage techniques later on.
Basic Slipped Edge Stitch Tutorial
This method is sometimes called a chain-stitch selvage because it forms a linked, chain-like edge that remains smooth and easy to work with.
What You’ll Need
Any yarn, straight needles, and a flat stitch pattern such as stockinette stitch. Practicing on a small swatch is recommended to observe how the edge behaves.
Also Read: How Do You Make a Slip Knot for Knitting? Easy Guide
Instructions
- Cast on the required number of stitches
- On every row:
3. Repeat this sequence consistently for the entire piece
This technique controls edge tension and produces a stable border that lies flat after blocking.
Pro Tip
Consistency is more important than precision. Using the same edge treatment on every row prevents uneven borders and simplifies finishing.
Common Mistakes and How to Fix Them
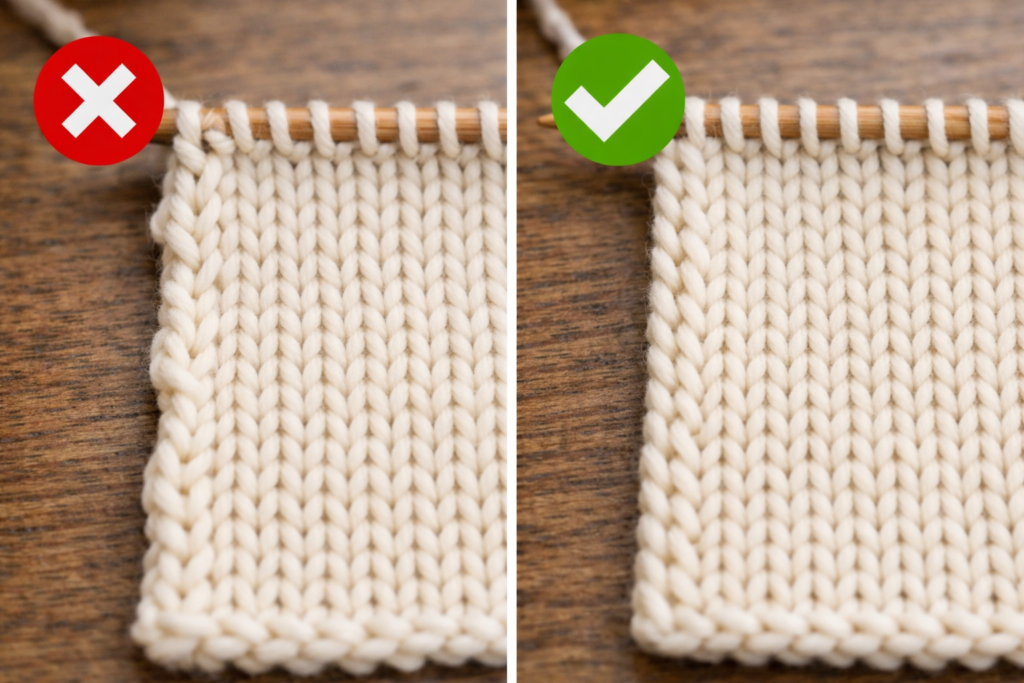
Even simple edge stitch techniques can fail if tension and consistency are overlooked. The issues below are the most common and easiest to correct.
Mistake 1: Inconsistent Edge Treatment
Problem: Switching between slipping and knitting edge stitches mid-project disrupts the edge structure and creates uneven sides.
Fix: Choose one edge-stitch method before you begin and apply it consistently throughout the project.
Mistake 2: Edge Stitches Worked Too Tightly
Problem: Over-tightened slipped stitches restrict elasticity, leading to puckering and difficulty during seaming.
Fix: Allow the working yarn to relax slightly when slipping edge stitches. The goal is a firm but flexible border, not a rigid one.
Mistake 3: Including Edge Stitches in the Pattern Count
Problem: Edge stitches that are treated as part of the decorative stitch pattern can distort lace, cables, or textured repeats.
Fix: Treat edge stitches as structural stitches only. Keep them separate from the pattern stitch count.
Mistake 4: Using Decorative Edges Where Structure Is Required
Problem: Decorative selvages may look appealing, but often lack the strength needed for garment assembly.
Fix: Reserve decorative edges for visible, non-seamed areas. Use stability-focused edge stitches for garments and construction seams.
Also Read: How to Fix a Dropped Stitch: A Complete Guide for Knitters
How Edge Stitch Choice Affects Finishing
Edge stitch selection directly influences how a project comes together during finishing.
What Well-Chosen Edge Stitches Determine
While blocking can improve minor inconsistencies, it cannot correct poorly structured edges. Edge stitches should be considered part of the construction process, not a decorative afterthought.
Also Read: How Do I Block a Knitted Sweater? Step-by-Step
Edge Stitch Knitting for Beginners: Practical Advice
For knitters building foundational skills, edge stitches offer valuable lessons in tension control and fabric behavior.
Getting Started with Edge Stitches
If you are just starting:
Also Read: How to Knit a Gauge Swatch: Quick Guide
Although edge stitches are small details, mastering them improves stitch control, finishing accuracy, and overall confidence skills that carry through every stage of knitting.
Frequently Asked Questions About Edge Stitch Knitting
Final Thoughts: Why Edge Stitches Matter More Than You Think
Edge stitch knitting may not be as visually striking as cables or lace, but it is one of the clearest indicators of skilled craftsmanship. Clean, even edges signal attention to detail, proper tension control, and technical understanding.
When treated as an integral part of your knitting—rather than an afterthought—edge stitches improve structure, finishing quality, and confidence. Mastering edge stitches teaches you control over fabric behavior, making all other aspects of knitting more predictable and professional.
Remember: well-chosen edge stitches are the foundation for polished seams, balanced patterns, and durable finished projects. Master the edges, and the rest of the fabric will follow.
Also Read: How Do You Weave in Ends in Knitting? Step-by-Step