Does the Slip Knot Count as a Stitch in Knitting? Explained
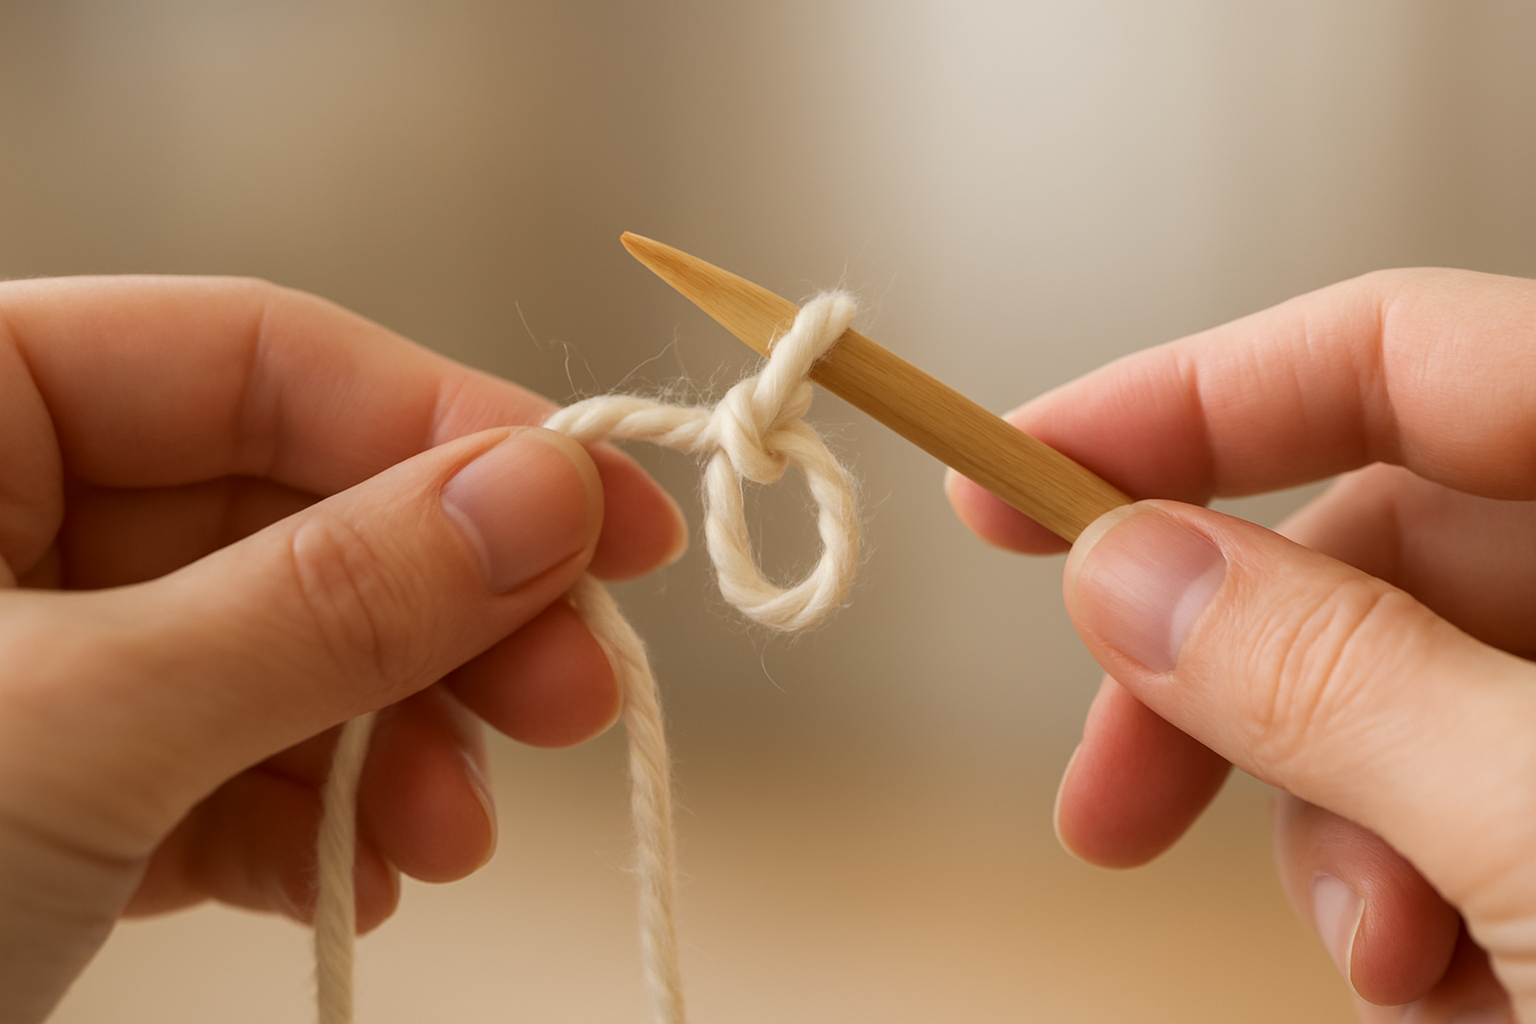
The slip knot is the earliest loop formed when starting a knitting project, acting as a small, adjustable anchor that secures the yarn to the needle. It tightens smoothly when pulled and loosens without resistance, making it an ideal way to set the tension before casting on your first real stitches.
Although it closely resembles a stitch, and many beginners assume the slip knot counts as a stitch, it isn’t part of the finished fabric; instead, it serves as the foundation that the cast-on method builds upon. This simple loop often confuses because its position on the needle looks identical to the stitches that follow.
However, once you understand the structure of your cast-on row, it becomes clear that the slip knot is a starting mechanism, not a working stitch. Its practicality, ease, and adaptability have made it a consistent feature across different knitting traditions and techniques.
Also Read: How to Cast on Knitting with Two Needles: A Complete Guide
Does the Slip Knot Count as a Stitch in Knitting?
If you’re just getting comfortable with your needles, it’s normal to pause at the first loop and wonder, Does the slip knot count as a stitch in knitting? It resembles one, sitting neatly on the needle and shaped like the loops that follow, but its purpose is different. The slip knot acts as a temporary anchor, holding your yarn in place while you cast on, not as a stitch that becomes part of your fabric.
This detail has confused knitters for years, and it makes sense. The first loop acts like a real stitch, especially when you’re learning how rows are made. But once you see how the first row is built, it becomes clear. The slip knot is not part of your fabric; it just helps you get started. When you make your first real stitch, the knot simply sits there and does its job in the background.
Many beginners get confused by this difference, often wondering whether the slip knot counts as a stitch in knitting. Understanding this distinction early helps you avoid counting mistakes, rough edges, and that annoying moment when your project has one extra stitch. Once you know what the slip knot does, it stops being confusing and becomes a helpful first step toward confident knitting.
Also Read: How to Count Rows in Knitting: A Complete Guide
Step-by-Step Guide to Making a Slip Knot
A slip knot is the structural starting point for most knitting cast-on methods. Although it looks simple, forming it correctly ensures your edge is stable, balanced, and easy to work with. A clean, properly tensioned slip knot prevents twisting at the beginning of your project and provides the smooth anchor your cast-on stitches need.
Below is the standard, reliable method used by experienced knitters and instructors.
Step 1: Form the Initial Loop
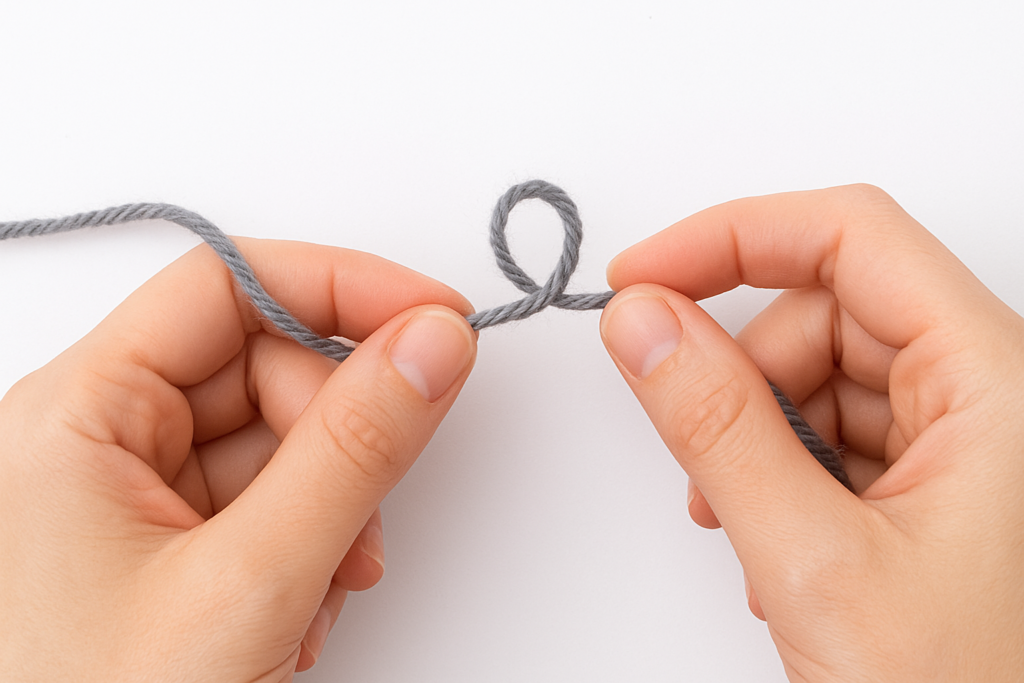
Hold the yarn with the tail end on the left and the working yarn on the right. Cross the tail end over the working yarn to create a loose loop. This initial crossing determines how the knot will behave when tightened. When done properly, it allows the loop to move smoothly along the working yarn without binding.
Step 2: Draw Up a Secondary Loop
Insert two fingers—or the tip of your needle—into the loop you just made. Catch a small section of the working yarn and pull it upward through the center of the first loop. This new loop is the one that will sit on your needle. This loop must not be twisted, as any twist interferes with proper stitch formation and can tighten unevenly as you work.
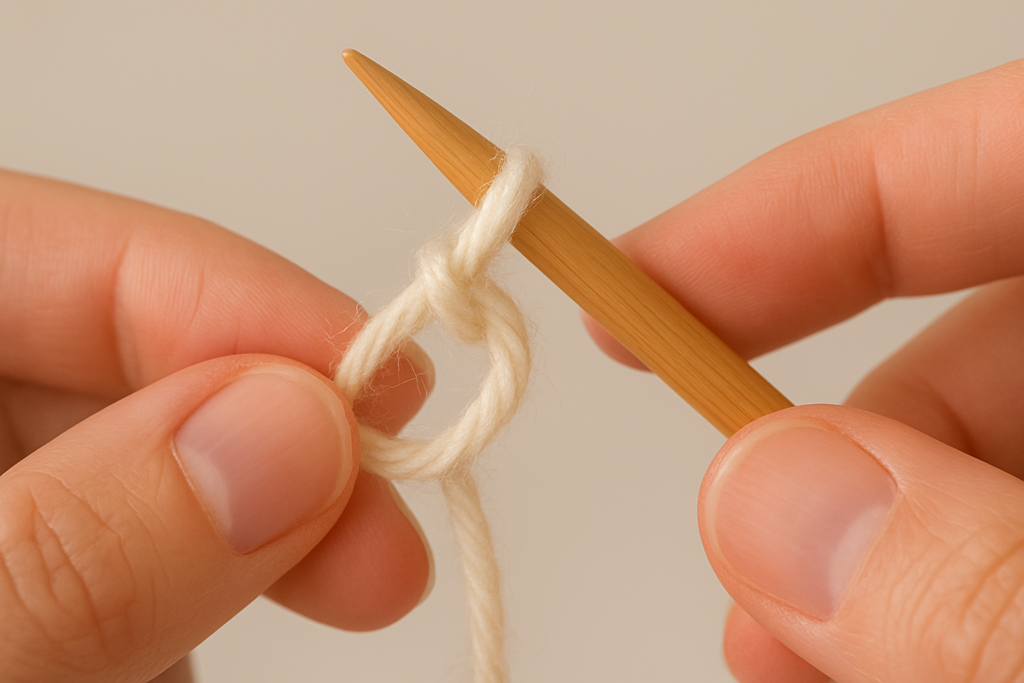
Step 3: Secure the Knot With Controlled Tension
Hold the new loop steady while gently pulling the tail end downward. This action tightens the knot at its base while preserving the loop’s ability to slide freely for adjustment. A well-made slip knot is snug, not rigid. Excessive tightening “locks” the knot, distorts the base of the first stitch, and can create tension problems in your cast-on edge.
Step 4: Position the Loop on the Needle

Place the newly formed loop on your needle. Use the working yarn to adjust the loop so it sits at a moderate tension—secure but easily movable.
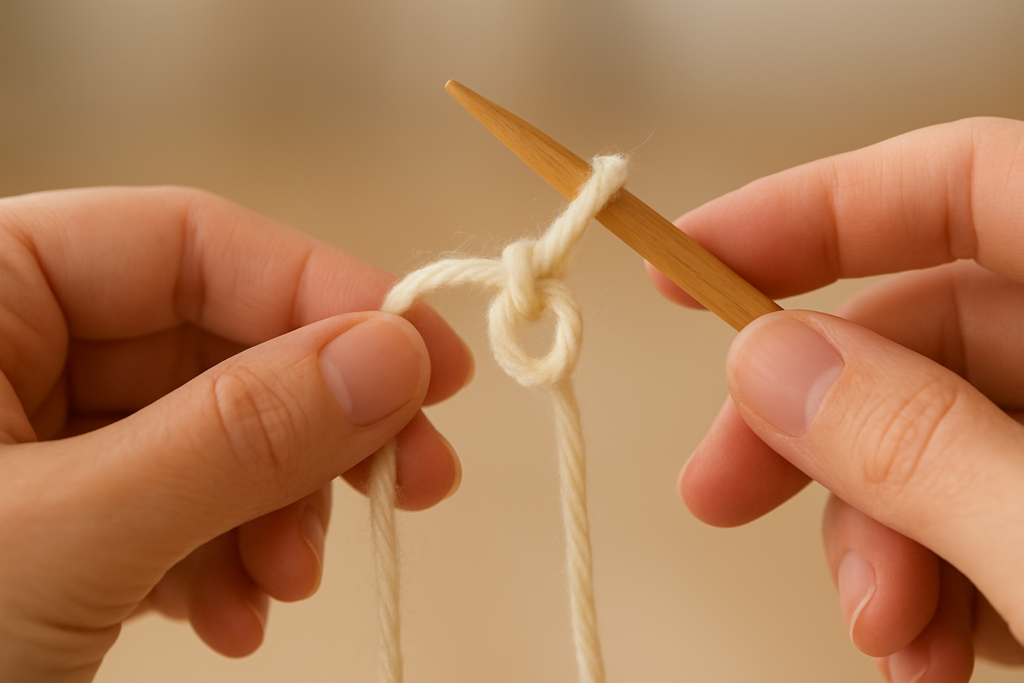
A properly sized slip-knot loop should:
- Slide when gently nudged
- Stay on the needle without gripping too tightly
- Allow the cast-on stitches that follow to sit evenly beside it
Ready to Begin Your Cast-On
Once the slip knot is positioned and adjusted, you can proceed with your preferred cast-on method. Remember: the slip knot itself does not count as a stitch. Your stitch count begins with the cast-on technique you use after placing the knot on the needle.
Also Read: How to Do a Long Tail Cast On Knitting? Easy Guide
Does the Slip Knot Count as a Stitch? (Myths Debunked)
A common question among knitters—beginners and even some experienced crafters—is whether the slip knot counts as a stitch in knitting. The answer is unequivocally no. In standard hand knitting, the slip knot serves as a starting anchor for your cast-on, not as a structural stitch that contributes to the fabric of your work. Understanding this distinction is essential for accurate stitch counts, clean edges, and consistent tension.
1. The Slip Knot Is a Foundation, Not a Stitch
A stitch is defined as a loop of yarn that forms part of the knitted fabric. Each stitch interacts with adjacent stitches, building the structure of your piece row by row. The slip knot, by contrast:
- Does not originate from a previous row
- It is not incorporated into the working pattern
- Does not interact with other loops to form fabric
It is essentially a temporary loop that secures the yarn to the needle, providing a foundation for the actual stitches that follow. Without this anchor, cast-on techniques would be less stable and more prone to uneven tension.
Also Read: How to Read Knitting Patterns? Beginners Guide
2. Including the Slip Knot in Your Count Will Cause Errors
Because the slip knot is not a true stitch, counting it as one introduces an extra loop into your row. For example, if a pattern calls for 20 stitches and you count the slip knot plus 19 additional cast-on loops, your row will contain 21 stitches—one more than intended.
Pattern assumptions typically include:
- Long-tail cast-on: slip knot not counted
- Knitted cast-on: slip knot not counted
- Cable cast-on: slip knot not counted
Accurate stitch counts begin after the slip knot, ensuring the final piece matches the pattern specifications.
3. Some Cast-On Methods Do Not Use a Slip Knot
Certain cast-on techniques are designed to start without a slip knot entirely. Examples include:
- German twisted cast-on
- Old Norwegian cast-on
- Thumb method variations
- E-loop cast-on
These methods demonstrate that the slip knot is optional and, in many cases, nonessential to forming a proper first row. Its absence does not compromise stitch count or edge stability.
4. Why Confusion Around the Slip Knot Persists
Visually, the slip knot resembles a stitch, as it rests on the needle like a looped stitch. This similarity can mislead beginners into including it in their tally. However, unlike a true stitch, it does not integrate with the row structure—its purpose is purely functional.
Patterns and instructors consistently emphasize: do not count the slip knot as a stitch. Recognizing this distinction helps knitters avoid common mistakes such as uneven edges, miscounted rows, and tension issues.
Key Takeaway
The slip knot is a temporary, structural anchor, not a stitch. Count your cast-on stitches after forming the slip knot to ensure accuracy. By understanding its role, you’ll maintain correct stitch counts, achieve even edges, and create consistently professional-looking knitting from the very first row.
Common Mistakes and How to Fix Them
Even experienced knitters occasionally encounter problems with slip knots, particularly when forming the first row of a project. Many common mistakes arise from misunderstanding the knot’s purpose or mishandling tension. Addressing these early prevents frustration and ensures a neat, stable edge.
1. Counting the Slip Knot as a Stitch
Mistake: Including the slip knot in your stitch count leads to one extra stitch, which can disrupt the pattern and distort edges.
Solution: Always remember that the slip knot is a starter loop, not a stitch. Count only the cast-on loops that follow the slip knot. For example, if a pattern requires 20 stitches, cast on the slip knot first, then add 20 additional stitches—never include the knot in the tally.
Also Read: How to Add Stitches When Knitting: A Complete Guide
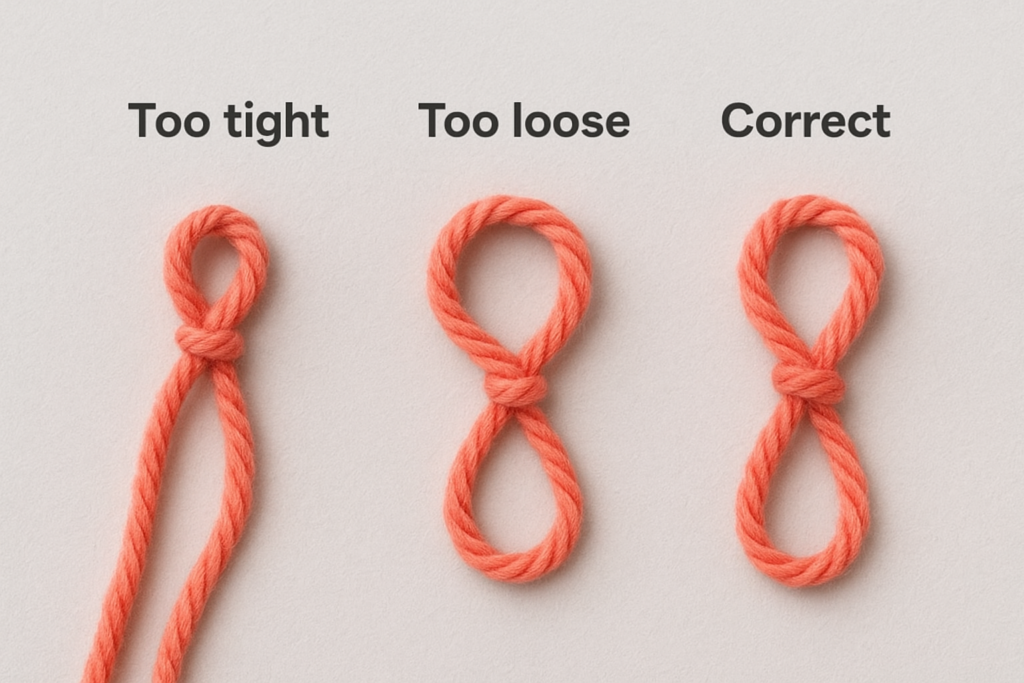
2. Making the Slip Knot Too Tight
Mistake: A slip knot pulled too tight can create tension issues, making the first stitch difficult to work into and causing the edge to pucker.
Solution: Adjust the loop so it is snug but not restrictive. The loop should move freely along the needle while still holding firm. Gentle tugging from both the tail and working yarn helps achieve even tension.
3. Making the Slip Knot Too Loose
Mistake: A loose slip knot may slide off the needle, leading to dropped stitches or instability in your first row.
Solution: Tighten the loop just enough to hold its position on the needle. It should remain secure when the needle is moved, but still allow smooth yarn feeding during the cast-on.
Also Read: How to Fix a Dropped Stitch: A Complete Guide for Knitters
4. Twisting the Slip Knot Incorrectly
Mistake: Twisting the slip knot incorrectly can result in a loop that rotates or twists on the needle, affecting the first stitches.
Solution: Ensure the tail crosses over the working yarn when forming the loop. Practice the motion slowly, confirming the loop sits flat on the needle before starting your cast-on.
5. Removing the Slip Knot Prematurely
Mistake: Some knitters attempt to remove the slip knot after casting on, thinking it is unnecessary, which can unravel the first stitch or destabilize the row.
Solution: Leave the slip knot in place. If a knot-free edge is desired, consider using a cast-on method that does not require a slip knot, such as the backward loop, German twisted, or E-loop cast-on.
Pro Tip for Beginners
Visualize the slip knot as a temporary anchor rather than a stitch. Taking the time to form it correctly will make your first row easier to manage, ensure accurate stitch counts, and result in a cleaner, professional-looking edge. Correcting these mistakes early builds good habits that carry through more complex knitting projects.
Also Read: What Size Needles for Beginner Knitting: 6 Easy Tips
Slip Knot vs. Other Cast-On Methods
The slip knot is the most common starting loop in knitting, but it is not the only way to begin a project. Different cast-on methods offer unique advantages, and knowing how the slip knot compares helps you choose the right technique.
1. Long-Tail Cast-On
The long-tail cast-on often begins with a slip knot. It creates a strong, elastic edge ideal for scarves, sweaters, and shawls. The slip knot acts as the anchor, while the following loops form the stitch count. Patterns assume the slip knot is not counted, so your row length matches the design.
Best for: Projects requiring flexibility and a neat edge.
Also Read: How Long Does It Take to Knit a Scarf? Time Guide
2. Knitted Cast-On
This method also often starts with a slip knot but builds the first row directly from the working yarn. The slip knot provides the initial loop, but your stitch count begins with the first knitted loop.
Best for: Beginners or simple edges where ease of execution is important.
3. Cable Cast-On
Cable cast-on produces a firm, well-defined edge. The slip knot is only a temporary anchor; the main stitch structure starts with the first cast-on loop.
Best for: Button bands, borders, or edges requiring stability.
4. E-Loop / Backward Loop Cast-On
Unlike traditional methods, the backward loop or E-loop cast-on does not require a slip knot. Loops are created directly on the needle from the working yarn. This technique produces smooth, minimal edges, useful in delicate lace or small projects.
Best for: Mid-row cast-ons, lace knitting, or projects needing an ultra-smooth edge.
5. German Twisted / Old Norwegian Cast-On
These advanced methods provide elasticity and a polished appearance. Many knitters skip the slip knot entirely, showing it is optional and not essential for maintaining stitch count.
Best for: Socks, ribbing, and garments requiring stretch.
Also Read: How to Join in Round in Knitting: Comprehensive Guide
FAQs About Slip Knot Count as a Stitch In Knitting
Conclusion: Does the Slip Knot Count as a Stitch in Knitting?
Understanding the slip knot is fundamental for knitters of all levels. While it looks like a stitch and sits on the needle, the slip knot does not count as a stitch. Its main function is to act as a temporary anchor, giving a stable starting point for cast-on stitches without adding to the fabric.
By forming a properly tensioned slip knot, knitters ensure:
- Accurate stitch counts
- Even professional-looking edges
- Smooth tension across the first row
Miscounting the slip knot or making it too tight or too loose are common pitfalls, but these are easily avoided with proper technique—especially once you understand that the slip knot counts as a stitch in appearance only, not in function. Knowing the slip knot’s role also helps knitters choose the best cast-on method, such as long-tail, cable, backward loop, or advanced elastic techniques, without fear of error.
For beginners, treating the slip knot as a foundational tool rather than a stitch clarifies patterns and reduces frustration. For experienced knitters, this understanding supports consistency, precision, and edge quality in all projects.
The slip knot is a small but critical part of knitting, giving stability and control at the start of every project. Mastering its formation ensures every row begins with confidence, accuracy, and a professional finish.
Also Read: How Long Does It Take to Knit a Sweater? Complete Guide