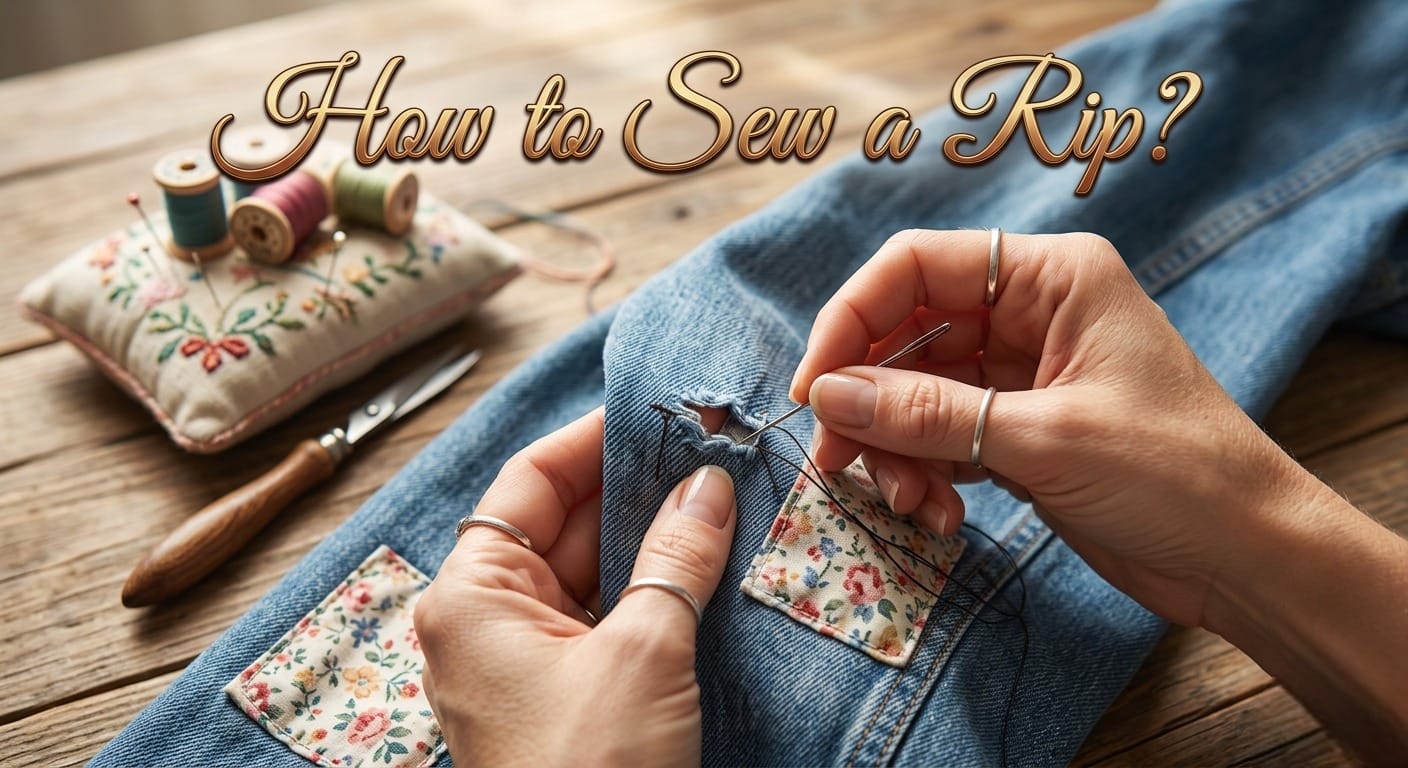
How to Sew a Rip? Easy 6- Step Guide
I’ve been knitting and crocheting for over a decade. Working with yarn, fabric, and handmade garments has taught me that even well-loved clothes eventually get damaged. A seam splits, a sweater snags, or your favorite jeans tear at the worst moment.
Knowing how to sew a rip is one of the most useful sewing skills you can learn because it helps you save money, extend the life of your clothes, and avoid replacing garments that are still wearable. Repairing torn fabric is easier than most beginners expect.
You don’t need professional sewing skills or expensive tools to fix a rip in clothing. With a simple needle, matching thread, and a few basic hand-sewing techniques, you can repair many small tears at home in under 15 minutes.
As someone who regularly works with yarn, fabric, and garment repairs, I’ve learned that small details make a big difference when mending a tear. In this guide, you’ll learn how to sew a rip by hand, the best stitches for different fabrics, tips for invisible mending, common mistakes to avoid, and when a fabric patch is a better option.
What You’ll Need: Materials for Mending a Rip
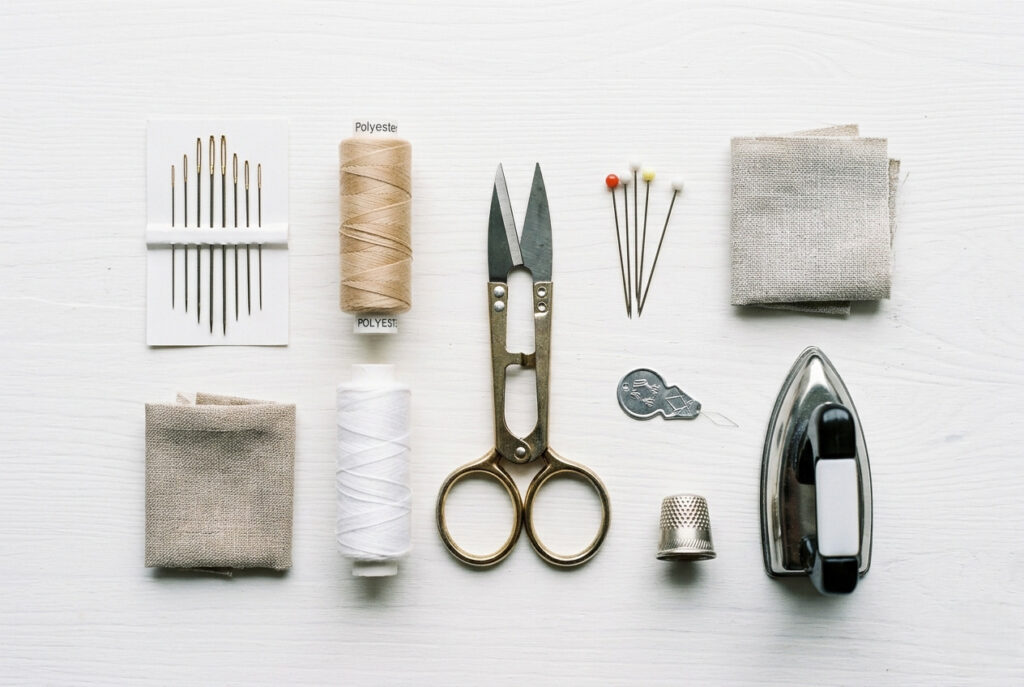
Before repairing torn clothing, gather a few basic supplies. The right tools make the repair cleaner and stronger. They also make the process less frustrating, especially if you’re learning how to sew a rip for the first time.
You do not need expensive sewing equipment. Most basic clothing repairs can be done with a simple needle and thread.
Essential Tools
Here’s what you’ll need for most hand-sewing repairs:
A fine needle works best for lightweight fabrics like t-shirts. Thicker fabrics require a stronger needle and heavier thread.
Also Read: Best Knitting Accessories: Top Picks 2026
Choosing the Right Thread Color
Thread color matters more than many beginners realize. Even a neat repair can become obvious if the thread doesn’t blend into the fabric properly.
For invisible mending:
For decorative or visible mending, you can intentionally use contrasting thread colors to turn the repair into a design detail. This approach works especially well on sweaters, denim, and handmade garments.
Preparing the Fabric Before Sewing
Most beginners want to start stitching immediately, but proper preparation is crucial for mending a tear. Taking a few extra minutes beforehand makes the repair stronger, cleaner, and less noticeable once finished.
Turn Clothing Inside Out
For most repairs, turning the garment inside out gives you better control and helps hide stitches more effectively. Sewing from the wrong side also protects the visible surface of the fabric and creates a cleaner-looking finish.
As a general rule, I always recommend working from the inside whenever possible.
Exceptions include:
Also Read: How to Sew a Knitted Sweater Together? Easy Guide
Line Up the Rip and Secure With Pins
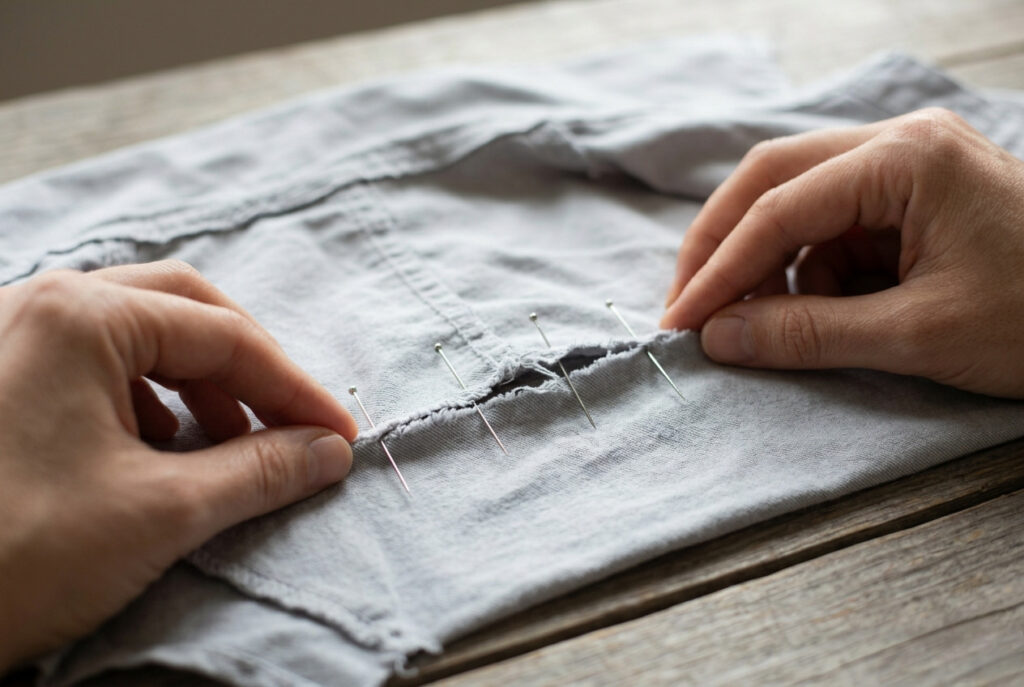
Carefully bring both sides of the tear together so the fabric edges meet without overlapping.
Avoid pulling or stretching the material while positioning the rip. The fabric should stay relaxed in its original shape to prevent puckering later.
Use straight pins or sewing clips to:
Place the pins perpendicular to the tear and space them about an inch apart for better control.
Clean and Press the Area
If the garment is dirty or wrinkled, wash and dry it before sewing. Dirt and oils can weaken fibers, and wrinkles make it harder to stitch evenly.
After cleaning, press the damaged area lightly with an iron.
This helps:
Skipping this step often leads to uneven stitching and a more visible repair, especially on lightweight fabrics.
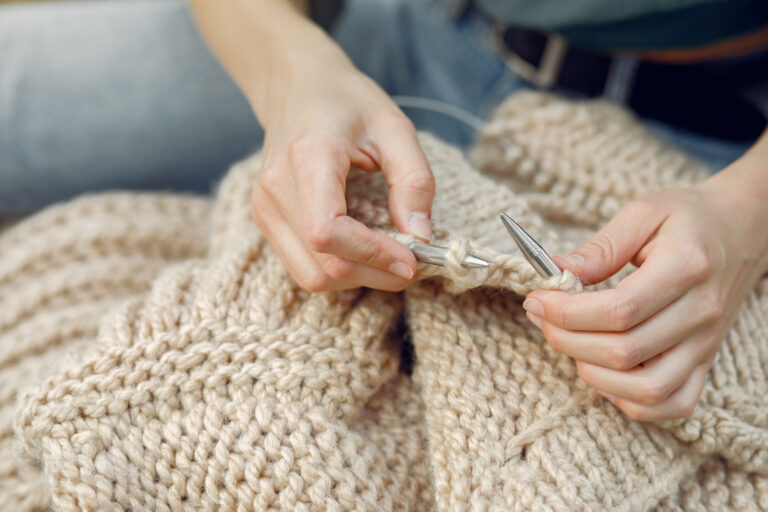
How to Sew a Rip by Hand (Beginner Method)
Learning how to sew a rip by hand becomes much easier when you break the process into simple steps. Even if you’ve never repaired clothing before, this method works well for most everyday fabric tears.
Take your time, keep your stitches even, and focus on maintaining gentle tension throughout the repair.
Step 1: Thread Your Needle and Knot the End
Cut a piece of thread about 18–24 inches long. Longer thread tends to tangle easily, while shorter thread may require constant rethreading.
Thread one end through the needle eye. If threading feels difficult:
For stronger repairs, many sewists prefer a double-strand of thread. To do this, pull both thread ends together and tie a knot at the bottom.
A double strand works especially well for:
Step 2: Start With 2–3 Anchor Knots
Begin sewing about ½ inch before the tear starts.
Insert the needle from the inside of the garment so the knot stays hidden. Make two or three tiny stitches in the same spot to create anchor knots.
This step is important because it:
Skipping anchor stitches often causes repairs to loosen after washing.
Step 3: Use the Blanket Stitch or Ladder Stitch
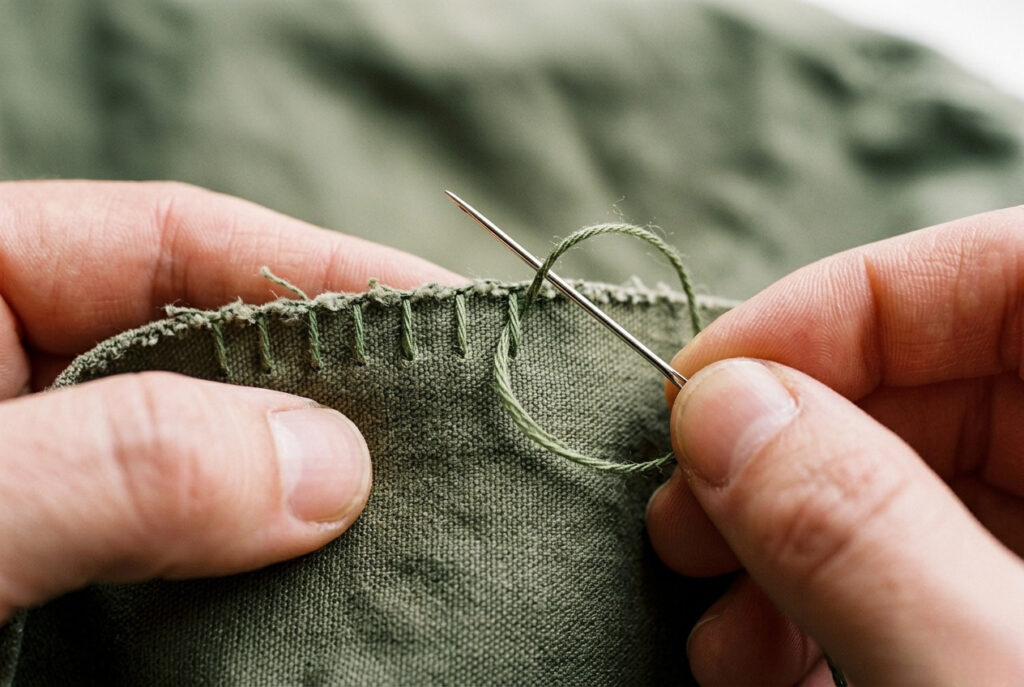
Two of the best stitches for repairing torn clothes by hand are the blanket stitch and ladder stitch. The right choice depends on whether you want strength, flexibility, or an invisible finish.
Blanket Stitch for Rips
The blanket stitch is ideal for:
To sew a blanket stitch:
Try to keep stitches roughly ¼ inch apart for balanced tension and a neat finish.
Also Read: How to Do Mattress Stitch? Easy 7-Step Guide
Ladder Stitch for Invisible Repairs
The ladder stitch, sometimes called a blind stitch, is one of the best invisible mending stitches for clothing repairs.
It works especially well for:
Instead of stitching directly across the tear, you sew small hidden stitches inside the folded fabric edges.
To create a ladder stitch:
When tightened carefully, the stitches almost disappear into the seam.
Also Read: How to Do a Whip Stitch? Quick Guide
Step 4: Sew From One End to the Other
Continue sewing slowly and evenly across the entire rip.
For cleaner results:
One of the most common beginner mistakes is pulling the thread too tightly. This causes puckering and makes the repair much more noticeable.
As a general guideline:
For extra durability, continue stitching about ½ inch beyond both ends of the tear.
Step 5: Turning a Corner (If Applicable)
Corner tears can feel awkward at first, especially near pockets or seam intersections.
When you reach a corner:
This helps prevent stress points from reopening later.
Step 6: Finish With Secure Knots
Once you reach the end of the repair:
Trim the excess thread carefully, leaving a small tail rather than cutting directly against the knot. Cutting too closely can cause the repair to loosen after repeated washing and wear.
How to Sew a Rip: Best Stitch Options for Different Rips
Not every tear should be repaired with the same stitch. The best method depends on the fabric type, damage location, and whether you want the repair visible or nearly invisible.
Choosing the right stitch improves the repair’s appearance and helps prevent the tear from reopening after washing and wear.
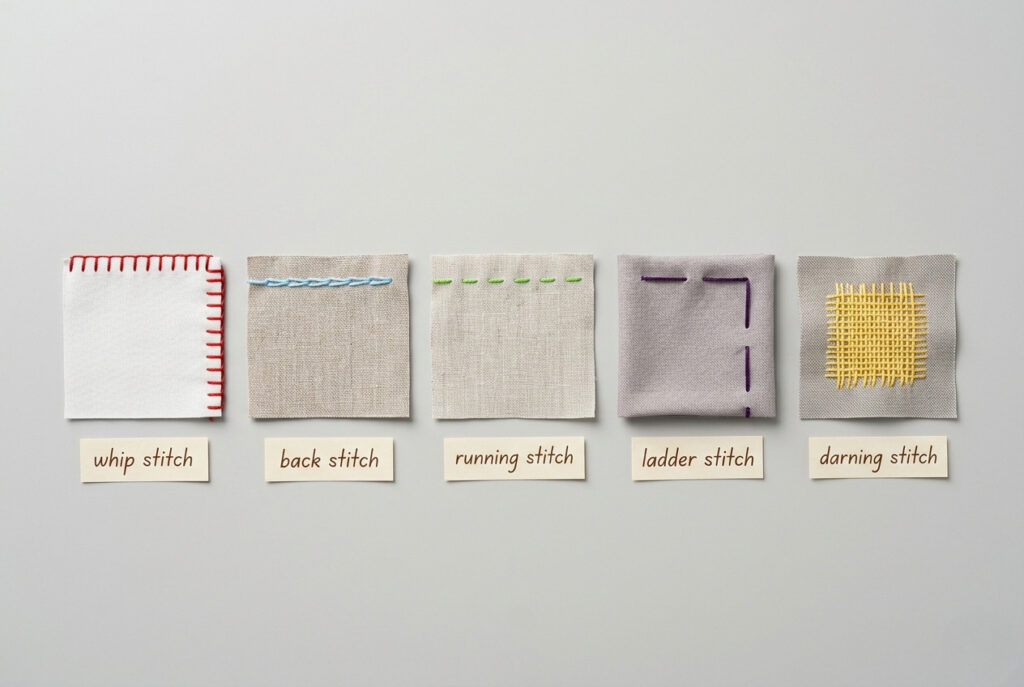
| Stitch | Best For | Visibility |
|---|---|---|
| Whip Stitch | Quick repairs, hems, thick fabrics | Visible |
| Back Stitch | Strong repairs, seams, denim | Slightly visible |
| Running Stitch | Temporary fixes, lightweight fabrics | Visible |
| Ladder Stitch | Invisible mending, seam repairs | Nearly invisible |
| Darning Stitch | Holes, knitwear, worn areas | Visible but functional |
Whip Stitch
The whip stitch is one of the easiest hand-sewing stitches to learn. It wraps diagonally around the fabric edges, pulling them together quickly.
Best for:
Since the stitches remain visible on the surface, this method is usually chosen for practicality rather than invisibility.
Back Stitch
The back stitch creates one of the strongest hand-sewn repairs. It closely resembles machine stitching because each stitch overlaps the previous one.
Use it for:
If you are repairing clothing that experiences frequent movement or tension, the back stitch is often the most durable choice.
Running Stitch
The running stitch is the simplest hand-sewing technique. The needle passes in and out of the fabric in a straight line, creating evenly spaced stitches.
Best for:
Though quick and easy, it is usually not strong enough for tears that experience frequent stress.
Ladder Stitch
The ladder stitch is one of the most useful invisible mending stitches. Instead of sewing directly across the tear, small hidden stitches are created inside folded fabric edges.
This technique works especially well for:
When the thread is gently tightened, the stitches almost completely disappear, making this one of the best options for discreet repairs.
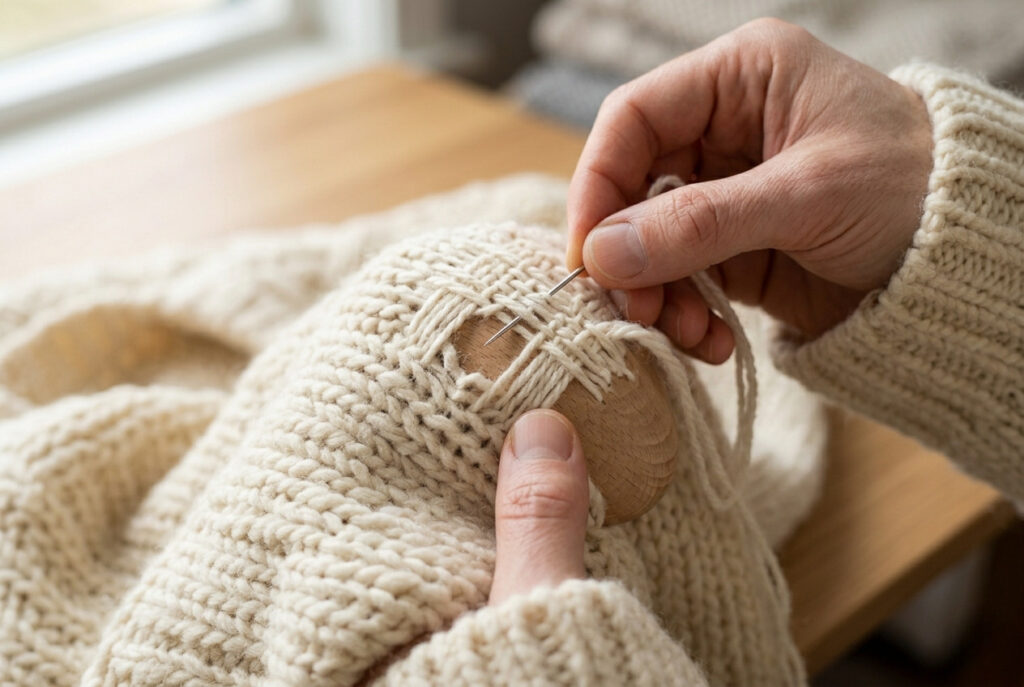
Darning Stitch for Holes
Darning differs from traditional tear repair because it rebuilds missing fabric rather than pulling torn edges together.
To create a darning repair, rows of parallel stitches are worked across the damaged area and woven with perpendicular stitches to form a reinforced grid.
Darning is ideal for:
With a knitting background, I often recommend darning for handmade garments because it preserves flexibility while extending fabric life. Though the repair may remain visible, it can become an attractive design feature rather than a flaw.
Tips for Invisible Mending
If you want your repair to blend naturally into the garment, a few small details can make a big difference. Invisible mending involves not just choosing the right stitch but also controlling tension, matching materials, and finishing the repair properly.
Don’t Pull Thread Too Tight
This is a common mistake beginners make when learning how to mend a tear in clothes.
Pulling the thread too tightly can cause:
Instead, maintain light, even tension throughout the repair. The torn edges should meet naturally without being forced together. When finished, the fabric should lie flat rather than bunch up around the stitches.
Work ½ Inch Above and Below the Tear
Many people stop sewing where the tear begins and ends, but this often causes the damage to reopen later.
Extending your stitching about ½ inch beyond both ends of the rip helps to:
This technique is especially important for:
Taper Stitches at the Beginning and End
Large uniform stitches make repairs more noticeable, especially on lightweight fabrics.
For a smoother finish:
This creates a natural transition that helps the stitching blend into the surrounding fabric.
Press With an Iron After Mending
Many sewists overlook this final step, but pressing can greatly improve the appearance of a repair.
A light press helps:
Always use the appropriate heat setting for your fabric and press from the wrong side when possible.
Match Thread Weight and Fiber Type
For the most discreet repair, choose thread that matches the fabric’s color, weight, and fiber content.
For example:
Matching the thread to the fabric helps the repair move naturally with the garment and makes stitching harder to detect.
Choose the Right Stitch for the Fabric
Even perfect thread color won’t hide a repair if the wrong stitch is used.
For the least visible results:
Selecting the proper stitch often impacts invisibility more than the thread itself.
Common Mistakes to Avoid
Even simple clothing repairs can look messy or fail if a few basic sewing principles are overlooked. After years of working with yarn, fabric, and garment repairs, I’ve noticed most beginners make the same handful of mistakes. Avoiding them will help you create stronger, neater, and longer-lasting repairs.
Using the Wrong Thread Color
One of the quickest ways to draw attention to a repair is using thread that doesn’t match the fabric. Well-executed stitches can stand out if the thread color is noticeably lighter, darker, or brighter than the garment.
For less visible repairs:
A carefully matched thread helps the repair blend into the surrounding fabric and creates a more professional-looking finish.
Pulling Thread Too Tight
This is one of the most common mistakes beginners make when learning how to sew a rip by hand.
Excessive tension can cause:
The goal is to bring the torn edges together gently, not force them together. Your stitches should hold the fabric securely while allowing it to lie flat naturally. If the fabric bunches as you sew, loosen your tension and smooth the material before continuing.
Not Anchoring Knots Properly
Weak starting or ending knots often cause repairs to come undone after a few washes. Without secure anchor stitches, the thread can gradually loosen during normal wear and laundering.
For a stronger repair:
Taking a few extra seconds to secure the thread properly can significantly increase the repair’s lifespan.
Also Read: How Do You Make a Slip Knot for Knitting? Easy Guide
Skipping the Inside-Out Step
Many beginners sew directly from the outside of the garment because it seems easier. This often leads to visible stitches, uneven tension, and a less polished appearance.
Whenever possible:
This simple step usually produces a cleaner, more professional-looking repair.
Using Dull Scissors
Dull scissors can affect the quality of your repair. Blunt blades often:
This leaves the repair looking untidy. A small pair of sharp sewing scissors makes trimming thread easier and helps achieve a cleaner finish.
Choosing the Wrong Stitch for the Fabric
Not every tear should be repaired with the same stitch.
For example:
Matching the stitch to the fabric type and the tear’s location creates a stronger, more durable repair.
How to Sew a Rip vs. When to Use a Patch
Sometimes, sewing the edges of a tear together isn’t the best solution. Many small rips can be repaired with simple hand stitching, but some damage requires extra support to prevent the fabric from tearing again. Knowing when to use a patch can save time and create a much stronger, longer-lasting repair.
Fabric Weakening
Before repairing a tear, examine the fabric around the damaged area.
If the surrounding material feels:
Stitching the rip closed may place extra stress on weakened fibers. Often, the fabric tears again next to the repair.
Instead, reinforce the area using:
This support distributes tension more evenly and extends the garment’s life.
Large Holes vs. Thin Rips
A thin rip and a hole require different repair methods. Small tears, seam splits, and narrow rips can often be stitched closed because the fabric edges still meet naturally. When fabric is missing, stitching alone cannot replace the lost material.
Larger holes usually require:
Pulling a large hole closed often causes:
How to Patch a Rip Effectively
For many clothing repairs, a patch provides the strongest solution.
Follow these basic steps:
For heavily worn garments like jeans, work pants, or children’s clothing, adding a few rows of extra stitching can improve durability.
Choosing the Right Patch Material
For the best results, select a patch that closely matches the original fabric.
Examples include:
Using similar fabric helps maintain the garment’s flexibility, appearance, and comfort.
Consider Decorative Visible Mending
Not every repair has to be hidden. Visible mending has become increasingly popular because it turns repairs into a design feature rather than something to disguise.
Decorative patches work particularly well on:
As someone who works regularly with knitted and handmade items, I’ve found that a thoughtfully placed patch can often add more character to a garment than the original fabric ever did.
How to Sew a Rip on Different Fabrics
Not all fabrics behave the same way when they’re torn. A repair method that works perfectly on denim may fail on a stretchy t-shirt or delicate knit sweater. Before you start sewing, consider the fabric type. Choosing the right thread, stitch, and repair technique can make the difference between a repair that lasts years and one that comes apart after a few wears.
How to Sew a Rip in Jeans and Denim
Denim is one of the most durable fabrics you’ll encounter, but it also experiences significant stress, especially around knees, pockets, and inner thighs.
For denim repairs:
If you’re learning how to sew a rip in pants by hand, adding a denim patch behind the tear can dramatically increase the lifespan of the repair. This is particularly useful for jeans that have worn thin over time. For large tears, don’t rely solely on stitching. Reinforce the area with matching denim to distribute stress and prevent new rips nearby.
How to Sew a Rip in T-Shirts and Stretch Fabrics
Stretch fabrics require a different approach because they move and flex during wear.
For successful repairs:
One of the biggest mistakes beginners make is treating knit t-shirts like woven fabrics. Tight stitching restricts stretch, causing the repair to ripple or pucker. For tears in jersey knit fabrics, a ladder stitch often produces the cleanest and least noticeable result.
How to Sew a Rip in Sweaters and Knitwear
Knit fabrics behave very differently from woven fabrics because they’re made from interconnected loops rather than tightly woven threads. When a sweater tears, those loops can continue unraveling if the damage isn’t addressed quickly.
For sweater repairs:
This is especially important when learning how to fix a hole in sweater hand sewing projects, where maintaining the fabric’s original appearance is often the goal. With a knitting background, I often recommend using matching yarn instead of regular sewing thread for visible sweater repairs. This helps the mend blend more naturally into the surrounding knit structure.
Also Read: How to Add New Yarn to Knitting? Step-by-Step
Delicate Fabrics
Lightweight fabrics such as silk, rayon, chiffon, and fine cotton require extra care.
For delicate materials:
Because these fabrics can show needle marks more easily, invisible mending techniques such as the ladder stitch are often the best option.
Canvas, Workwear, and Heavy Fabrics
Heavy-duty fabrics experience more stress and abrasion than everyday clothing.
For these repairs:
Durability should be the priority when repairing workwear, outdoor gear, and utility fabrics.
FAQ: How to Sew a Rip
Final Thoughts: How to Sew a Rip
Learning how to sew a rip is a practical skill that can save money, reduce waste, and help extend the life of your favorite clothes. Whether you’re repairing a torn shirt, fixing jeans, or mending a sweater, the process gets easier with practice.
Start with small repairs, focus on neat, consistent stitches, and don’t worry if your first attempts are imperfect. Each repair builds your confidence and improves your hand-sewing skills.
One of the most rewarding parts of mending your own clothing is knowing a simple needle and thread can give a garment a second life. Instead of replacing clothes at the first sign of damage, you can repair them quickly and keep them in your wardrobe for years.
With the techniques in this guide, you’ll be prepared to repair torn clothes by hand, tackle common fabric tears, and create stronger, longer-lasting repairs when accidents occur.