

How to Knit a Scarf With a Loom? Easy Beginner Guide
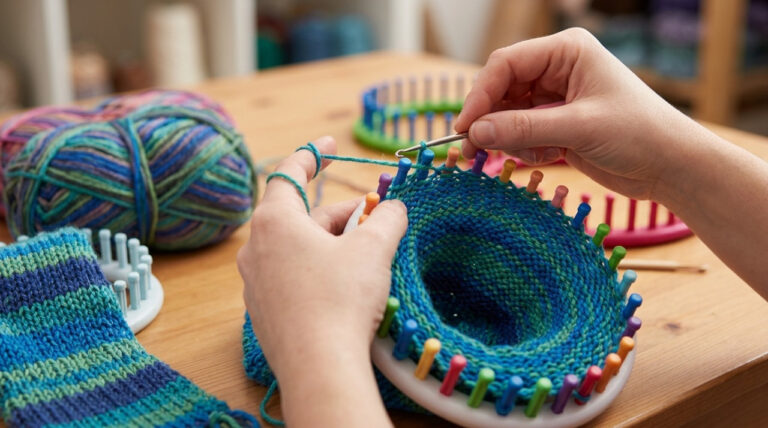
Learning how to knit a scarf with a loom is a practical way to start loom knitting without knitting needles. A knitting loom holds loops on small pegs, letting you create fabric with a simple hook and yarn. This makes it easier to follow the stitch pattern and track your work.
A scarf is a suitable first project because it uses simple rectangular construction without complicated shaping. With a long loom, medium-weight yarn, and a few basic techniques, you can make a scarf in your preferred width, length, and color.
Also Read: How to Use a Knitting Loom? 6 Easy Steps
In this guide, I’ll show you how to prepare your loom, cast on, work knit and purl rows, and finish edges. I’ll also explain how to add fringe, adjust scarf size, and correct common loom-knitting mistakes.
Why Is Loom Knitting a Good Choice for Beginners?
Loom knitting offers a way to create knitted fabric without managing stitches on two traditional needles. The pegs hold the loops while you use a loom hook to work each stitch.
For beginners, this setup can make the basic knitting process easier to follow.
Some useful features include:
- Stitches stay on the pegs: You can see the working loops and identify dropped stitches more easily.
- Simple repetitive movements: Many beginner projects use the same wrapping and knitting motions across each row.
- Adjustable project size: You can change the number of active pegs to make a narrower or wider scarf.
- Different stitch options: Looms can produce knit, purl, ribbed, and textured fabrics.
- Useful for other projects: The same basic skills can be used to make hats, cowls, blankets, and other accessories.
Also Read: Best Beginner Knitting Projects for New Knitters
A loom does not make every project easier, but it offers a different way to manage stitches that many beginners find comfortable.
Tools and Materials for Loom Knitting a Scarf
Before starting, gather the supplies. The right combination of yarn, loom, and accessories helps maintain consistent stitches throughout the scarf.
1. Knitting Loom
A rectangular or long loom is a practical choice for making a flat scarf.
Most long looms have two parallel rows of pegs called rakes. For the flat, single-layer scarf pattern in this guide, you’ll work along one row of pegs.
You can also use both rows for double-knit construction, but that requires a different wrapping pattern and finishing method.
Choose a loom with peg spacing suitable for your yarn. If the pegs are too close together for bulky yarn, the stitches may become difficult to work.
2. Loom Hook
A loom hook is used to lift yarn loops over the pegs and complete stitches.
Choose a comfortable hook that fits easily between the pegs. A smooth handle helps when working on a longer project.
3. Yarn
Medium-weight yarn (Category 4) is a good choice for beginners because the loops are easy to see and handle.
For a standard adult scarf, approximately 250–350 yards is a reasonable starting estimate depending on width, length, stitch pattern, and yarn thickness.
Consider these yarn options:
| Yarn Type | Characteristics | Suitable Use |
| Acrylic | Generally easy to care for and widely available | Everyday scarves |
| Wool | Warm with natural elasticity | Cold-weather scarves |
| Wool blend | Combines properties of different fibers | Everyday and winter accessories |
| Cotton blend | Breathable with less natural stretch | Lightweight scarves |
For your first project, choose smooth yarn rather than a highly textured or fuzzy strand. Smooth yarn makes it easier to see the loops and identify where to place your hook.
Also Read: Best Yarn for Scarves: Top Picks 2026
4. Yarn Needle
A large-eye tapestry needle helps secure loose yarn ends after removing the scarf from the loom.
Choose a needle that accommodates your yarn comfortably.
5. Scissors and Measuring Tape
You need scissors to cut the working yarn and prepare fringe. A measuring tape helps check the scarf’s width and length while knitting.
6. Optional Accessories
Stitch markers can help identify the first and last active pegs, especially when following a repeated stitch pattern.
A crochet hook is also useful for adding fringe and securing loose loops.
Also Read: Best Knitting Accessories: Top Picks 2026
Choosing the Right Loom for a Scarf
The type of loom you choose affects the width, thickness, and construction of your finished scarf.
1. Rectangular or Long Loom
A long loom has two parallel rows of pegs. You can use it for flat single-knit panels or double-knit projects depending on how you arrange the yarn.
For the beginner pattern in this guide, use one row of pegs to create a flat single-layer scarf.
Benefits:
2. Round Loom
A round loom is usually associated with projects worked continuously in the round, such as hats and cowls.
However, some round looms can be used to make flat panels by working across a selected group of pegs and turning at the end of each row.
Check that your loom and pattern support flat-panel knitting before starting.
3. Understanding Figure 8 and Single-Row Knitting
A long loom can support different knitting constructions.
Single-row knitting: Uses one row of pegs to make a flat panel. This is the method used in the main scarf pattern below.
Figure 8 double knitting: Uses both rows of opposing pegs with yarn wrapped between the two rows in a figure-eight pattern. It creates a thicker, double-layer fabric.
These methods are different, so follow the cast-on and stitch instructions designed for your chosen construction.
Simple Loom Knit Scarf Pattern for Beginners
Before the detailed instructions, here is a quick overview of the project.
| Pattern Detail | Instructions |
| Skill level | Beginner |
| Construction | Flat panel |
| Loom | Long or rectangular loom |
| Active pegs | Determined by desired width and loom gauge |
| Yarn | Worsted weight (Category 4) |
| Stitch pattern | Garter stitch |
| Finished width | Approximately 5–7 inches |
| Finished length | Approximately 55–70 inches |
| Main techniques | E-wrap knit and purl stitch |
The measurements are starting points. Your results will depend on peg spacing, yarn thickness, and knitting tension.
Stitch instructions:
Pattern repeat:
Repeat these two rows until the scarf reaches the desired length.
Also Read: What is Garter Stitch in Knitting? Easy Knitting Explained
Step-by-Step: How to Knit a Scarf With a Loom
Now that you have your supplies and pattern, you can begin working on the scarf.
Step 1: Prepare the Loom and Choose the Working Pegs
Place your rectangular loom on a flat surface.
For this tutorial, use one row of pegs to create a flat panel. Mark the first and last working pegs with stitch markers if this helps you track the scarf width.
The number of pegs determines how many stitches you work across the fabric. Start with a small sample to check if the width matches your preference.
If the fabric is too narrow, add more active pegs. If it is too wide, use fewer.
Step 2: Make a Slip Knot
Start by making a slip knot with your yarn.
Place it around the loom’s anchor peg, located at one end or along the side of many long looms. Tighten gently so the yarn stays in position without becoming hard to move.
Leave a tail long enough to weave in after finishing the scarf.
Also Read: How Do You Make a Slip Knot for Knitting? Easy Guide
Step 3: Cast On Using the E-Wrap Method

E-wrap cast-on is a straightforward way to begin a single-row loom-knitting project.
Follow these instructions:
- Bring the working yarn to the first active peg.
- Wrap the yarn around the peg in an e-shaped motion.
- Continue wrapping each peg.
- Push the loops towards the lower part of the pegs.
- Wrap the same pegs a second time so each working peg holds two loops.
- Use the loom hook to lift the lower loop over the upper loop on each peg.
After this process, one loop should remain on each working peg.
You have established the first row of your scarf.
Step 4: Work the First Knit Row
For the first pattern row, use the e-wrap knit stitch.
- Hold the working yarn behind the active pegs.
- Wrap each peg using the e-wrap motion.
- Check that each working peg has two loops.
- Insert the loom hook beneath the lower loop.
- Lift the lower loop over the upper loop and off the peg.
- Repeat across the entire row.
When finished, one loop should remain on each peg.
Maintain relaxed, consistent tension. Pulling the yarn too tight can make working the next rows difficult.
Step 5: Work the Purl Row
The next row uses the purl stitch to create a different fabric texture.
For a neat edge, use this sequence:
To make a purl stitch:
- Bring the working yarn in front of the peg.
- Insert your loom hook through the existing loop.
- Catch the working yarn and pull a new loop through the old loop.
- Remove the old loop from the peg.
- Place the new loop securely on the peg.
Repeat across the middle pegs, then work the final peg with the knit stitch.
Also Read: How to Purl Stitch Knit? Easy Step-by-Step Guide
Step 6: Repeat the Knit and Purl Rows
Continue alternating these two rows:
Row 1: E-wrap knit across all active pegs.
Row 2: Knit the first peg, purl the middle pegs, and knit the last peg.
This creates a garter-style fabric with ridges that help the scarf lie flatter than a panel worked entirely in e-wrap knit stitches.
Check the fabric periodically to make sure the edges remain even.
Step 7: Continue Until the Scarf Reaches the Desired Length
Continue repeating the knit and purl rows until the scarf reaches the desired length.
A standard adult scarf often measures 55–70 inches, though personal preference and style may call for a shorter or longer piece.
Use a measuring tape to check the length as you work.
Maintain consistent wrapping pressure across every peg. If the yarn is too tight, the fabric may feel stiff. If the loops are too loose, the stitches can become uneven.
Step 8: Bind Off the Scarf
Once the scarf reaches the desired length, secure the remaining loops before removing it from the loom.
A chain or flat-panel bind-off is a suitable option for this construction.
- Start at one end of the working row.
- Lift the first loop from its peg using a loom hook or crochet hook.
- Pick up the loop from the next peg.
- Pull the new loop through the loop already on your hook.
- Continue along the row, drawing each next loop through the previous one.
- When only the final loop remains, cut the yarn and leave a tail 6–8 inches long.
- Pull the tail through the final loop and tighten it gently.
- Weave the remaining end into the fabric using a tapestry needle.
Keep the bind-off tension consistent with the rest of the scarf. A tight edge may restrict the fabric’s stretch.
Also Read: How to Bind Off Knitting: Easy Ultimate Guide
Step 9: Weave in the Yarn Ends
After removing the scarf from the loom, check both ends for loose yarn tails.
Thread each tail through a tapestry needle and weave it into nearby stitches on the wrong side of the fabric.
Follow the stitch structure and avoid pulling the yarn tight. Once the ends are secure, trim the excess carefully.
Also Read: How Do You Weave in Ends in Knitting? Step-by-Step
This finishing step helps prevent the yarn from coming loose during regular use.
How to Add Fringe to a Loom-Knit Scarf

Fringe is an optional finishing detail that changes a scarf’s appearance. Use the same yarn as your project or a contrasting shade.
Follow these steps
- Cut several strands of yarn to approximately 16–20 inches long.
- Group two or three strands together, depending on the desired fringe thickness.
- Fold the group in half to form a loop.
- Insert a crochet hook through a space along the short edge of the scarf.
- Pull the folded loop through the opening.
- Pass the loose yarn ends through the loop.
- Tighten to secure the fringe.
- Repeat at intervals along the edge.
- Trim the ends evenly if necessary.
Add fringe to the opposite end using the same spacing and number of strands.
Avoid making the bundles too thick because they can pull on the scarf edges.
How to Customize Your Loom-Knit Scarf
One useful feature of loom knitting is that you can adjust the project to your preferred size and yarn choice.
Adjusting the Scarf Width
The number of active pegs determines the width of your flat-panel scarf.
To create a wider scarf, work across more pegs. For a narrower scarf, use fewer pegs.
Because peg spacing and yarn gauge vary, make a sample before starting the project.
Adjusting the Scarf Length
Knit additional rows for a longer scarf. Stop earlier for a shorter design.
For a typical adult scarf, 55–70 inches is a useful starting range.
Changing Yarn Colors
You can introduce a new yarn shade at the beginning of a row to create horizontal stripes.
Leave enough yarn at both ends for weaving in later. If you plan to alternate colors over several rows, decide whether to carry the unused strand along the edge or cut and rejoin it.
Choose a color-changing method that does not pull the side edge inward.
Also Read: How to Change Colors While Knitting? 5 Easy Methods
Expert Tips for Loom-Knit Scarf Beginners
A few simple habits can make the project easier and help you maintain consistent fabric.
1. Maintain Even Yarn Tension
Wrap each peg with similar tension. Avoid pulling the working yarn tightly after a stitch.
Consistent tension helps the scarf maintain a more uniform width.
2. Check the Pegs Before Each Row
Before beginning another row, look across the working pegs and make sure every peg has its expected loop.
This helps you notice a dropped stitch before it becomes harder to correct.
3. Choose Smooth Yarn
Smooth yarn makes loops easier to see. Fuzzy or highly textured yarn can make it hard to identify the correct strand with the loom hook.
4. Practise the Purl Stitch Separately
If new to loom knitting, practise a few purl stitches on spare pegs before starting the scarf.
Getting familiar with the movement helps reduce uneven loops.
5. Measure the Fabric During Knitting
Check the width and length regularly. This helps you notice tension changes before the scarf becomes too large or small.
6. Watch the Edge Stitches
The first and last pegs help define the scarf’s side edges. Keep their tension consistent and follow the pattern’s edge instructions throughout.
Common Problems When Loom Knitting a Scarf

Beginners may encounter issues while working with a loom. Understanding their causes makes correcting them easier.
1. Curling Edges
Problem: The sides of the scarf roll towards the front or back.
Cause: Fabric made entirely with e-wrap knit stitches resembles stockinette and naturally curls.
Solution: Use a garter-style pattern by alternating knit and purl rows, as explained in this tutorial. A suitable border can help reduce curling.
2. Dropped Stitches
Problem: A loop slips off a peg, leaving a gap in the fabric.
Cause: A loose loop, accidental movement, or missed stitch during knitting.
Solution: If you notice the dropped loop early, use your loom hook to place it back on the peg. If a full stitch column has unravelled, use a crochet hook to rebuild the missing stitches.
Also Read: How to Fix a Dropped Stitch: A Complete Guide for Knitters
3. Uneven Scarf Width
Problem: One section becomes wider or narrower than the rest.
Cause: Inconsistent tension or accidentally skipping a working peg.
Solution: Check every active peg before starting a new row. Keep the yarn wrapping motion relaxed and consistent.
4. Tight Cast-On Edge
Problem: The starting edge does not stretch as much as the rest of the scarf.
Cause: The yarn was pulled too tightly while creating the initial loops.
Solution: Leave enough slack during the cast-on process and check the starting edge after completing the first row.
5. Loose Loops
Problem: Some stitches appear larger than the surrounding fabric.
Cause: Uneven wrapping pressure or loops being left too loose on the pegs.
Solution: Check tension regularly and gently adjust loose stitches before continuing.
6. Uneven Bind-Off Edge
Problem: The finished edge looks tighter or more gathered than the cast-on edge.
Cause: Pulling the bind-off loops too firmly.
Solution: Keep the chain bind-off relaxed and check the edge as you work. If the edge is too tight, undo the bind-off and repeat it with more consistent tension.
How Long Does It Take to Loom Knit a Scarf?
The time depends on your experience, yarn thickness, number of active pegs, stitch pattern, and finished length.
A beginner may need several hours or multiple knitting sessions to complete a scarf. Once you are familiar with wrapping the pegs and working the stitch pattern, the repeated movements usually become more comfortable.
Thicker yarn may produce a wider fabric with fewer rows. Lighter yarn and smaller stitches may require more work to reach the same dimensions.
Instead of following a fixed time estimate, measure your progress and work at a pace that maintains even stitches.
Also Read: How Long Does It Take to Knit a Scarf? Time Guide
Frequently Ask Questions
Conclusion
Learning how to knit a scarf with a loom introduces you to several useful techniques, including casting on, working knit and purl stitches, maintaining tension, and finishing the edges.
Also Read: How to Block a Knitted Scarf: 5 Easy Steps
A simple garter-style scarf is a convenient first project because it uses a repeated two-row pattern and requires little shaping. Adjust its width by changing the number of active pegs and its length by continuing the pattern until you reach your preferred size.
Start with smooth yarn and a suitable long loom. Check your stitches regularly and pay attention to the edges as you work. Once comfortable with the basic movements, you can experiment with different colors, textures, and scarf designs.
The skills you develop can also be used for other loom-knitting projects, including cowls, hats, and blankets.

One Comment