What Is a Basting Stitch in Sewing? Easy Guide
If you’ve spent time learning garment sewing, quilting, or dressmaking, you’ve probably heard the term basting stitch. But what is a basting stitch in sewing, and why do experienced sewists rely on it so often?
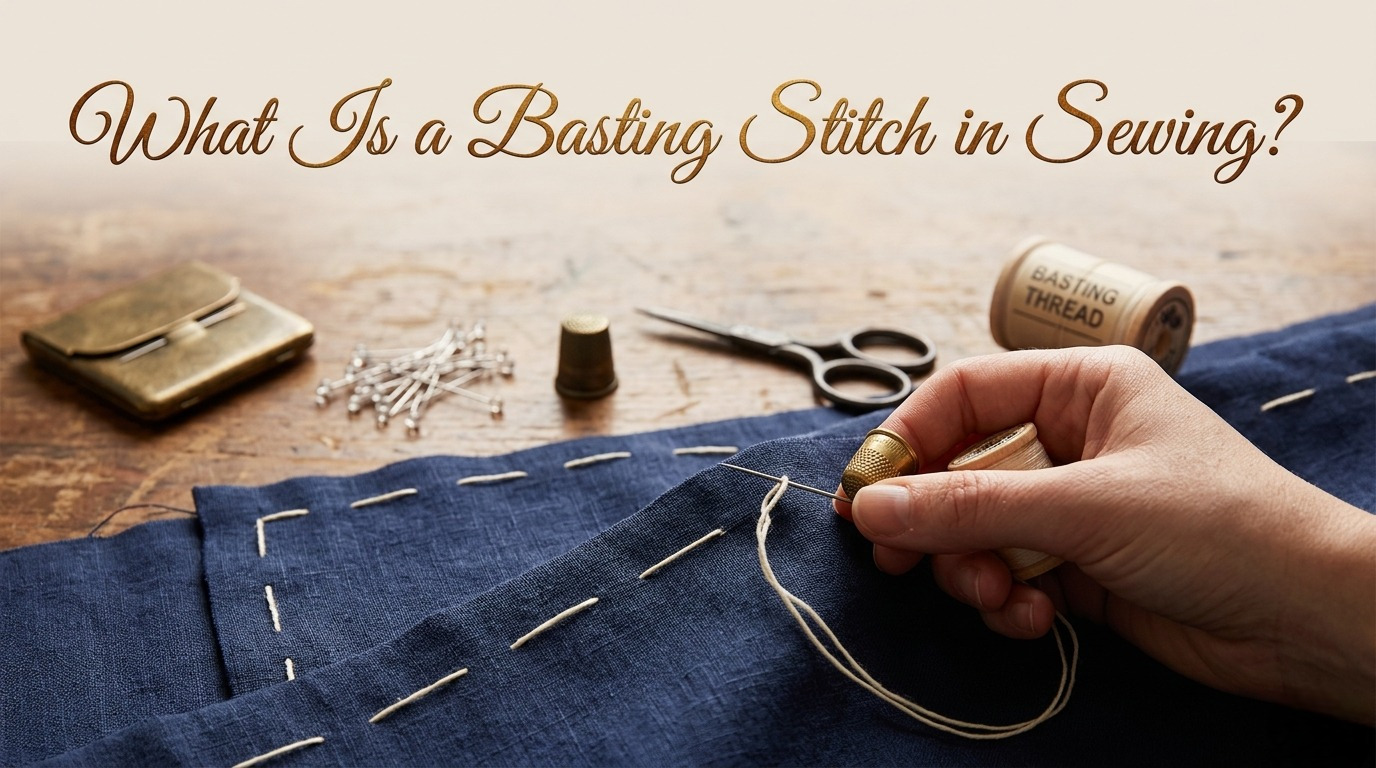
A basting stitch is a long, temporary stitch used to hold fabric layers together before permanent sewing begins. Unlike regular stitches, it is removed after the final seam. Its purpose is to keep the fabric stable, aligned, and easier to manage during construction.
Think of basting as a temporary guide for your sewing project. It prevents shifting, improves accuracy, and makes detailed sewing tasks easier to control. Whether you’re fitting a garment, attaching a zipper, gathering fabric, matching seams, or sewing slippery materials, basting reduces mistakes before permanent stitching starts.
Although many beginners skip this step to save time, experienced sewists use basting regularly because it creates cleaner seams, smoother shaping, and more professional results.
What Is a Basting Stitch?
A basting stitch is a temporary sewing stitch made with a longer stitch length than standard sewing stitches. It is used to secure fabric layers in place during a project’s assembly.
Because the stitches are loose and easy to remove, basting lets sewists test fit, check alignment, and stabilize fabric before final sewing. It helps prevent puckering, shifting, or uneven seams during construction.
Basting can be done by hand or with a sewing machine. Hand basting offers better control for delicate fabrics and detailed areas, while machine basting is faster for long seams and larger projects.
This technique is commonly used in garment sewing, tailoring, quilting, zipper installation, and fabric gathering. It is especially helpful when working with lightweight, slippery, or layered fabrics that tend to move during sewing.
Why Use a Basting Stitch?
Using a basting stitch in sewing may seem like an extra step, but it saves time, improves accuracy, and prevents costly mistakes later. Temporary stitching controls fabric, maintains alignment, and simplifies adjustments before permanent seams are sewn.
From garment construction to quilting and tailoring, basting remains one of the most useful techniques for achieving cleaner, more professional-looking results.
Controls Slippery and Delicate Fabrics
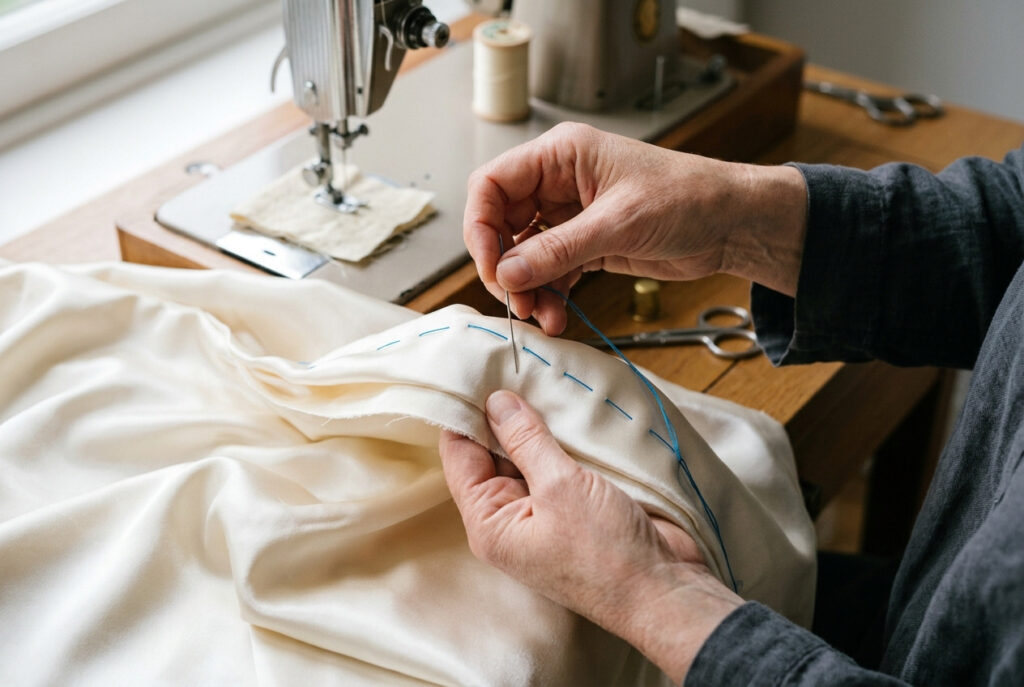
Some fabrics shift during sewing, even when pinned carefully. Materials like satin, silk, chiffon, velvet, and lightweight cotton can slide under the presser foot, causing uneven seams and distorted shaping.
A basting stitch helps stabilize these fabrics by holding the layers together evenly along the seamline. This added control is especially helpful when sewing curved seams, bias-cut fabric, linings, or delicate materials that stretch or move easily.
With the fabric held in position, final stitching becomes smoother and more accurate.
Prevents Shifting During Fitting and Sewing
Garment fitting often requires adjustments before permanent stitching is completed. Temporary seams allow sewists to test the fit of dresses, jackets, skirts, sleeves, and other fitted garments without committing to final construction immediately.
A basting stitch for fitting garments makes it easier to:
Instead of removing tight permanent stitches repeatedly, temporary stitching adjusts quickly with minimal stress on the fabric.
Basting also helps keep seams aligned during machine sewing, reducing twisting, puckering, and uneven edges.
Makes Gathering and Easing Easier
A basting stitch for gathering fabric is commonly used in ruffles, gathered skirts, sleeve caps, cuffs, and decorative sewing details.
Long temporary stitches create threads that can be pulled to gather fabric evenly. This method produces softer gathers and better distribution without bulk or stretching.
Basting is also useful for easing fabric, where one section of material must fit smoothly into another without visible gathers. Sleeve installation is one of the most common examples.
With temporary stitching in place, the fullness can be adjusted gradually before the final seam is sewn.
Helps With Zipper Installation
Zippers require precise placement to look clean and professional. Even slight shifting during sewing causes uneven edges, twisting, or puckering around the zipper area.
Basting temporarily secures the zipper before permanent stitching begins, helping maintain straight alignment and smoother construction.
Many experienced sewists prefer basting zippers by hand first because it provides greater control and accuracy during installation.
Improves Accuracy on Detailed Sewing Areas
Detailed sewing sections often become easier to manage with temporary stitching. Areas such as collars, cuffs, pleats, pockets, waistbands, and layered seams benefit from additional stability before final sewing begins.
Basting helps:
This added precision contributes to cleaner construction and more polished results.
Reduces Dependence on Pins
Pins can distort delicate fabric or shift during sewing, especially on long seams or lightweight materials. Basting provides more consistent control across the entire seam instead of securing small sections.
For some projects, temporary stitching creates smoother alignment than pins and reduces the need for constant repositioning while sewing.
Supports Better Quilting Accuracy
In quilting projects, multiple layers must remain evenly aligned throughout the sewing process. Basting helps secure the quilt top, batting, and backing before quilting begins.
Without proper stabilization, quilt layers wrinkle, bunch, or shift during stitching.
Temporary basting keeps the layers flat and evenly distributed, resulting in smoother quilting lines and a more balanced finished quilt.
Types of Basting Stitches
Basting stitches vary in use depending on the level of control, stability, and flexibility required. As a result, different types are used in garment construction, quilting, tailoring, and decorative sewing.
Understanding the main types of basting stitches helps you select the most appropriate method for each project and fabric type.
Even (Running) Basting Stitch
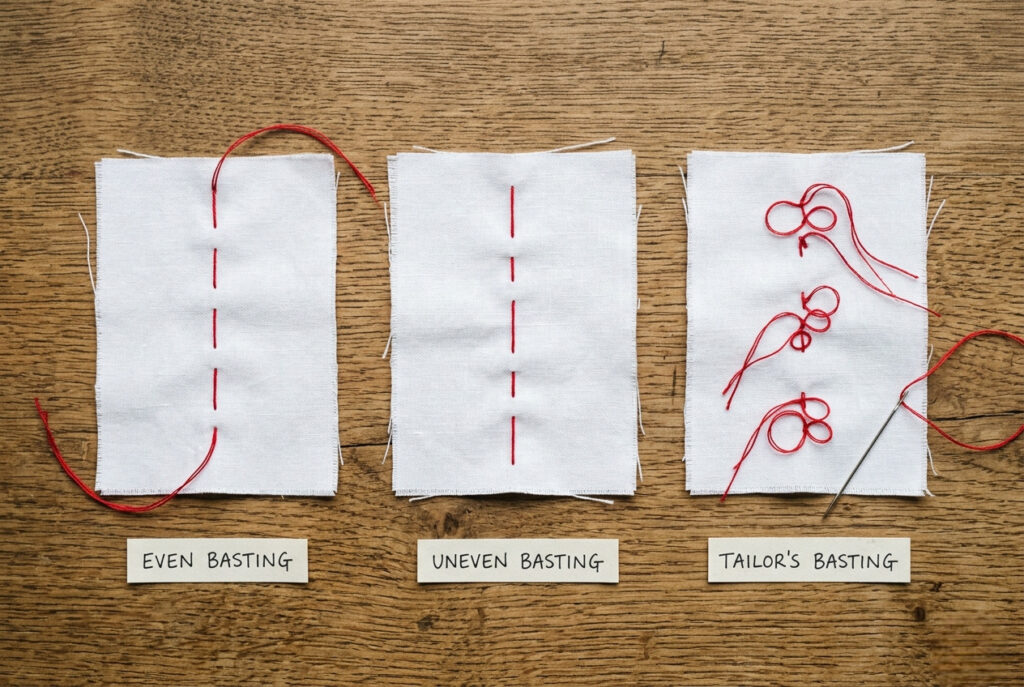
The even basting stitch, also known as the running basting stitch, is the simplest and most common temporary stitch. It uses long, evenly spaced stitches sewn in a consistent rhythm through the fabric.
Because the stitches are loose and uniform, they are easy to remove after the final seam is sewn. This method works well for general sewing preparation and temporary seam holding.
Although often compared, an even basting stitch and a running stitch are not identical. A running stitch can be permanent, while a basting stitch is always temporary and intended for later removal.
Best Uses
Characteristics
The even basting stitch is especially helpful for beginners due to its simple, flexible, and easily controlled rhythm.
Also Read: What Is Edge Stitch in Knitting? Easy Guide
Also Read: What is Garter Stitch in Knitting? Easy Knitting Explained
Uneven Basting Stitch
An uneven basting stitch alternates long and short stitches rather than using equal spacing. The shorter stitches anchor the fabric more securely, while still allowing for easy thread removal.
This technique offers greater stability than even basting and is well-suited for fabrics that shift easily or require extra control during fitting and construction.
Although slightly slower to sew, the uneven rhythm reduces the risk of seams slipping during handling.
Best Uses
Characteristics
Tailoring and dressmaking projects often use uneven basting to keep seams aligned while allowing for adjustments during fitting.
Tailor’s Basting Stitch
Tailor’s basting, also known as tailor tack stitching, is widely used in professional tailoring and fine garment construction. It creates loose thread loops or small anchored stitches to temporarily transfer markings and maintain alignment between layers of fabric.
Unlike standard temporary seams, tailor’s basting is used for precision work where accurate placement is essential. It marks darts, pleats, seam lines, hems, button placements, and other details without damaging delicate fabric.
The loose, visible stitches are easily removed after markings or adjustments are complete.
Best Uses
Characteristics
Professional sewists and tailors use tailor’s basting when precision, fabric control, and accurate fitting are critical.
How to Sew a Basting Stitch by Hand
Learning how to sew a basting stitch by hand is one of the most useful beginner sewing skills. Hand basting gives you better control over fabric placement, helps improve sewing accuracy, and makes fitting adjustments much easier before permanent stitching begins.
Unlike regular sewing stitches, a basting stitch is temporary. The goal is to hold the fabric securely without making the stitches hard to remove later.
Hand basting is especially useful for:
Once you learn the basic technique, hand basting becomes a simple but valuable part of the sewing process.
Supplies You’ll Need
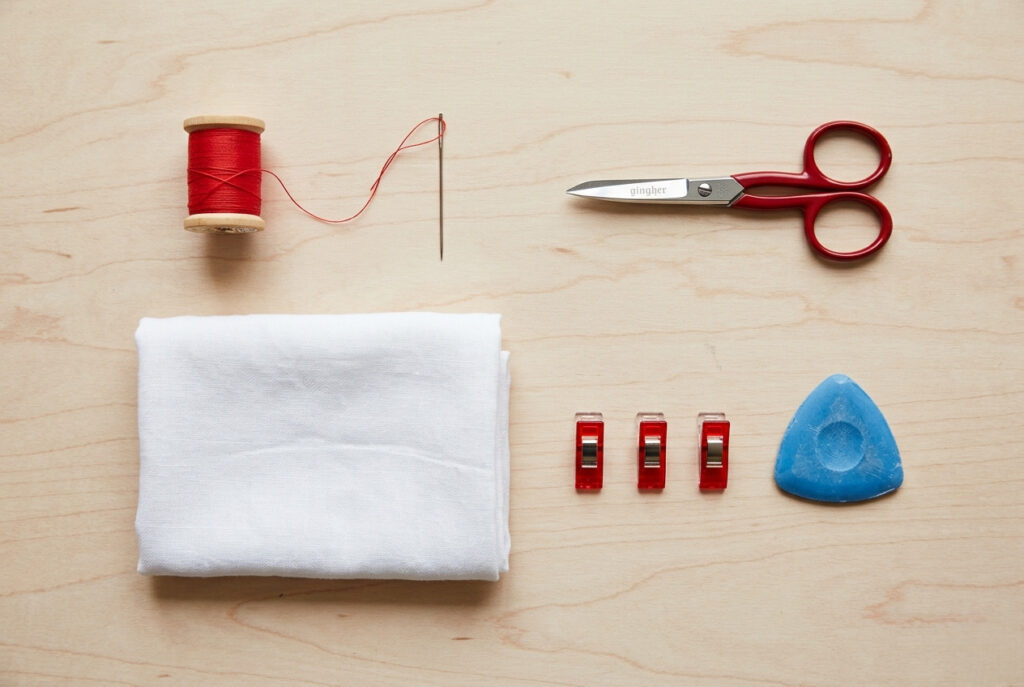
Before starting, gather the following materials:
Using contrasting thread makes the basting stitches easier to see and remove after permanent sewing is complete.
Also Read: Best Knitting Accessories: Top Picks 2026
Also Read: What Size Needles for Beginner Knitting: 6 Easy Tips
Step 1: Mark the Seamline
Lightly mark the seamline with fabric chalk, pins, or a washable marker if needed. This helps keep basting stitches close to the final sewing line and improves alignment.
For beginner projects, marking the seam first makes stitching easier and more consistent.
Step 2: Align the Fabric Layers
Place the fabric pieces together exactly as they will be sewn permanently. Match edges carefully and smooth out wrinkles or folds before stitching.
If needed, use a few pins or clips to hold the layers temporarily while basting.
Accurate alignment here helps prevent shifting during machine sewing.
Step 3: Thread the Needle
Cut a manageable thread length, usually 18 to 24 inches. A very long thread can tangle easily while sewing.
Tie a small knot at the thread end or leave a long tail instead of securing it tightly. Since basting stitches are temporary, heavy knotting or backstitching is unnecessary.
Step 4: Sew Long, Even Stitches
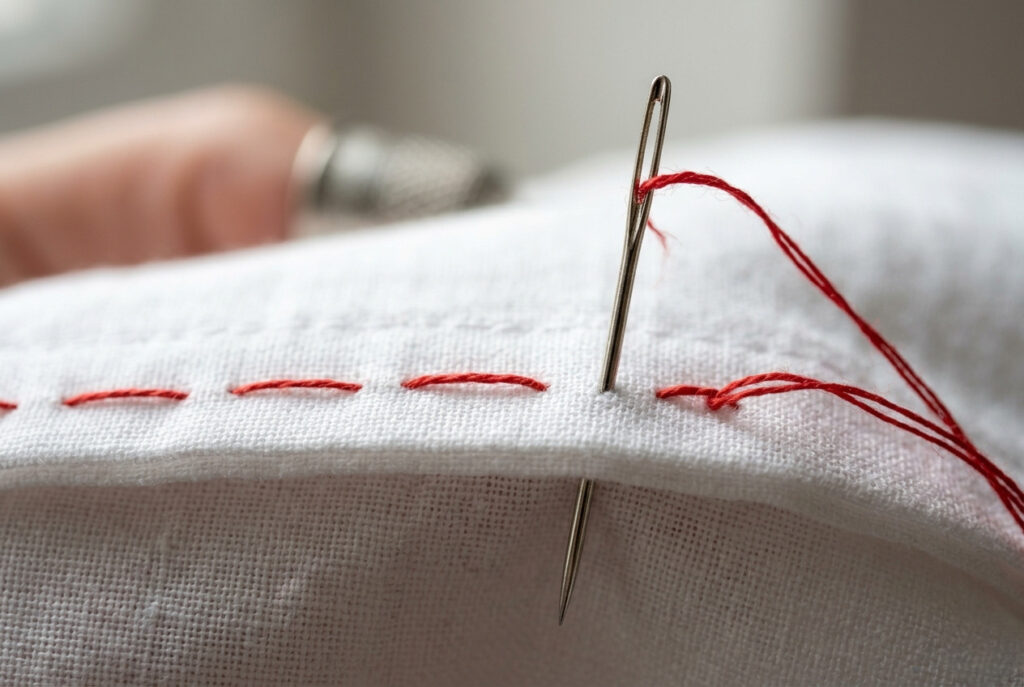
Insert the needle in and out of the fabric using long running stitches along the marked seamline. Most hand-basting stitches are ¼ to ½ inch long, depending on fabric and project.
Try to keep the stitches fairly even in size and spacing.
Avoid pulling the thread too tightly. The fabric should stay flat and smooth without puckering or distortion.
This method creates the classic even basting stitch commonly used for garment fitting and temporary seam construction.
Step 5: Leave Long Thread Tails
At the seam end, leave long thread tails instead of trimming them short. Avoid heavy backstitching because tight stitches make removal harder later.
Loose thread ends allow the basting stitch to be removed quickly once the permanent seam is complete.
Step 6: Check the Fabric Before Permanent Sewing
Before moving to final stitching, examine the seam carefully to make sure:
Adjusting at the basting stage is easier than fixing permanent seams later.
Beginner Tips for Better Hand Basting
A few simple habits make hand basting easier and more effective:
With practice, hand basting becomes faster and more natural. Although many beginners see it as an extra step, temporary stitching improves sewing accuracy, fabric control, and overall project quality.
How to Sew a Basting Stitch by Machine
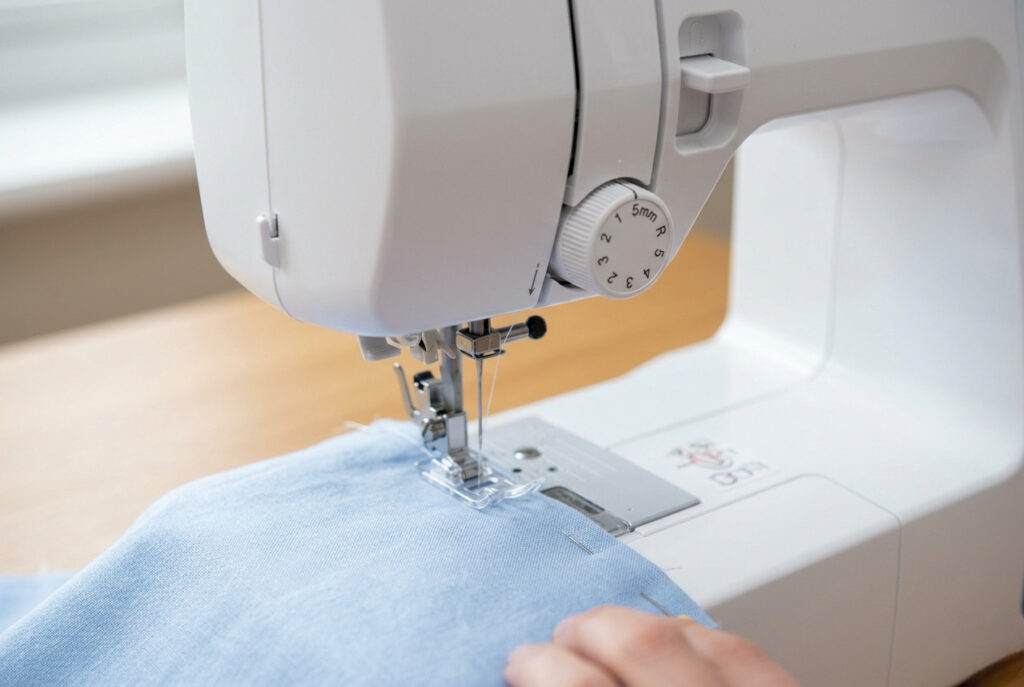
Machine basting is a fast and efficient way to hold fabric layers together before permanent sewing begins. While hand basting offers greater control for delicate details, machine basting works especially well for long seams, garment construction, quilting, gathering fabric, and larger sewing projects.
Learning how to baste by machine can improve sewing accuracy, reduce fabric shifting, and make final stitching much easier.
Since basting stitches are temporary, the goal is to secure the fabric without making the stitches hard to remove later.
Step 1: Adjust the Stitch Length
Set your sewing machine to the longest straight stitch length available. Most machines use a stitch length of 4–5 mm for machine basting.
Long stitches hold the fabric in place while remaining easy to remove after permanent stitching is complete.
Avoid short stitch lengths for basting because tight stitches:
Using the correct stitch length is crucial for successful machine basting.
Step 2: Prepare the Fabric
Place the fabric layers together exactly as they will be sewn permanently. Match edges carefully and smooth out wrinkles or folds before sewing.
Use pins or sewing clips, if needed, to temporarily keep the layers aligned.
For beginner projects, lightly marking the seamline with fabric chalk or a washable marker helps guide stitching more accurately.
Step 3: Choose the Right Needle and Presser Foot
A standard straight-stitch foot works well for most woven fabrics. Use regular all-purpose thread unless the project requires something more specialized.
For knit or stretchy fabrics, a long zigzag basting stitch may work better than a straight stitch because it allows slight movement without distorting the fabric.
This method is often used as a basting stitch for knits and stretch fabrics that tend to shift or stretch during sewing.
Step 4: Sew Along the Seamline
Sew slowly along the seamline while guiding the fabric gently through the machine. Avoid pulling or stretching the material as you sew because this can distort the seam.
Try to keep the stitching smooth and even throughout the seam length.
Machine basting is commonly used for:
Step 5: Avoid Backstitching
Do not backstitch at the beginning or end of the seam.
Backstitching locks the thread in place and makes the temporary stitches much harder to remove later.
Instead, leave long thread tails at both ends. Loose thread ends let the basting stitches pull out easily once permanent sewing is finished.
Step 6: Remove Pins Carefully While Sewing
Avoid sewing directly over pins whenever possible. Sewing over pins can:
Remove pins gradually as the fabric moves through the machine.
Step 7: Sew the Permanent Seam and Remove the Basting
After checking fit, alignment, or fabric placement, sew the final seam using a normal stitch length.
Once the permanent stitching is complete, carefully remove the basting stitches by clipping the thread at one end and gently pulling it out.
Using contrasting thread for machine basting makes removal much faster and easier.
Beginner Tips for Better Machine Basting
Machine basting becomes easier with practice. These simple tips can help improve results:
Although some beginners skip basting to save time, temporary stitching often prevents sewing mistakes and improves the quality of finished projects.
Common Uses of Basting Stitches
A basting stitch in sewing is a practical and versatile technique used in garment construction, quilting, tailoring, and decorative sewing. Although temporary, basting improves accuracy, stabilizes fabric, and simplifies difficult sewing tasks before permanent stitching begins.
From fitting garments to installing zippers, temporary stitching helps sewists maintain better control throughout the sewing process.
Fitting and Test-Basting Garments
One of the most common uses of basting stitches is garment fitting. Temporary seams allow adjustments before permanent sewing locks the fabric into place.
Many sewists create a test garment, often called a muslin or toile, and use basting stitches to assemble the pieces quickly for fitting.
This method helps identify:
A basting stitch for fitting garments is especially useful for dresses, jackets, blouses, fitted tops, skirts, and formal wear, where small fitting changes can significantly improve the final result.
Because the stitches are temporary, seams can be adjusted and re-basted multiple times without damaging the fabric.
Gathering Fabric for Skirts and Ruffles
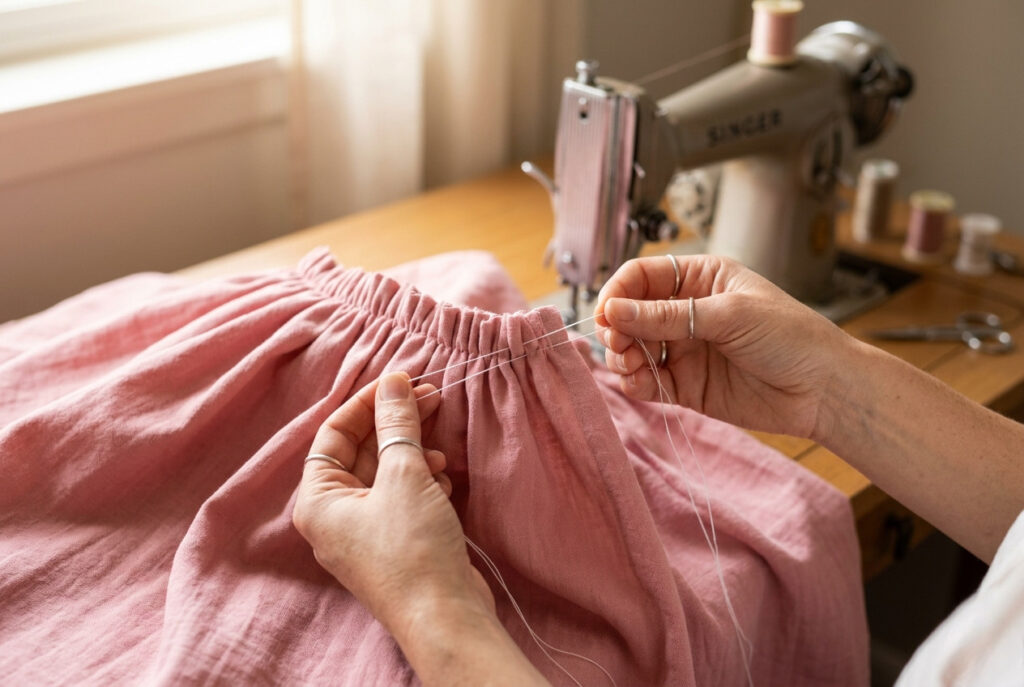
A basting stitch for gathering fabric is widely used to create soft gathers and controlled fullness in sewing projects.
Long rows of temporary stitches are sewn along the fabric edge and gently pulled to gather the material evenly. Many sewists use two parallel rows of basting stitches for smoother, balanced gathers.
This technique is commonly used for:
Basting creates cleaner gathers while reducing puckering and uneven distribution.
Also Read: How to Knit a Hat with Straight Needles? Beginner’s Guide
Also Read: How Long Does It Take to Knit a Sweater? Complete Guide
Attaching Zippers More Accurately
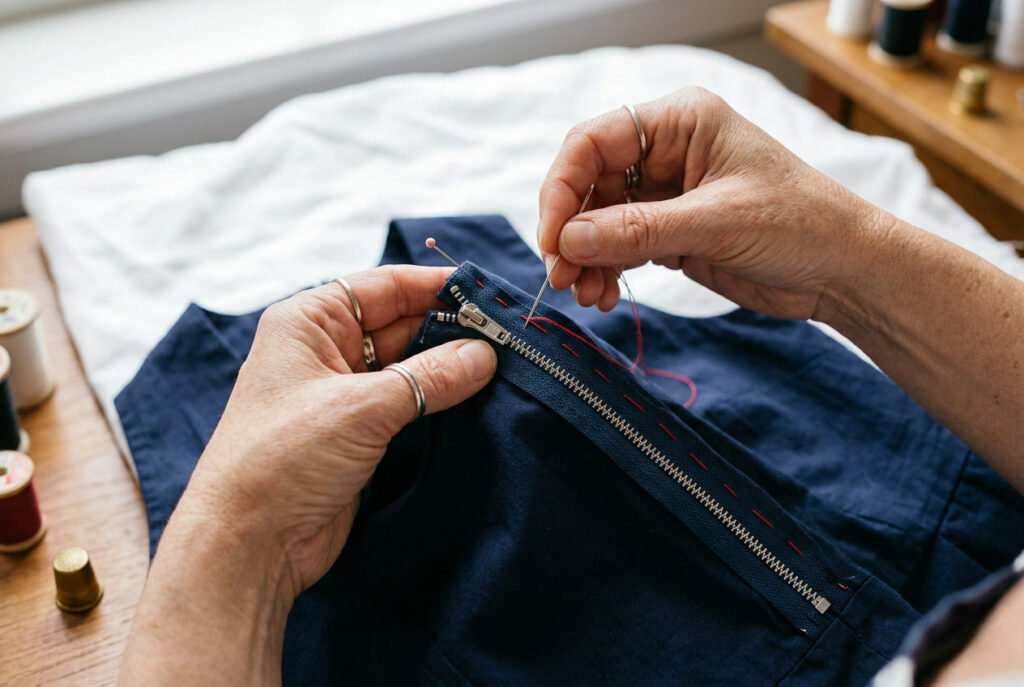
Zippers can shift easily during sewing, especially with lightweight or slippery fabrics. A basting stitch temporarily secures the zipper tape before permanent stitching begins.
This helps:
Many experienced sewists baste zippers by hand first because it provides greater control and allows adjustments before final stitching.
Invisible zippers especially benefit from careful temporary stitching since accurate placement strongly affects the finished appearance.
Matching Plaids, Stripes, and Patterns
Pattern matching becomes much easier when fabric pieces are basted together before final sewing.
Plaids, stripes, checks, and printed designs can easily become uneven if the fabric shifts during stitching. Temporary basting helps maintain accurate alignment across seams and keeps patterns visually continuous throughout the garment.
This technique is particularly helpful for:
Sewing Slippery or Delicate Fabrics
Lightweight fabrics such as silk, satin, chiffon, velvet, and organza often move under the sewing machine foot, making accurate stitching difficult.
Pins may not provide enough stability on curved seams or layered fabric sections.
Basting helps hold delicate materials securely in place while reducing:
Hand basting often provides better control than machine stitching alone for delicate sewing projects.
Also Read: Best Yarn for Baby Blanket: Trusted 2026 Picks
Quilting Layers Together
Quilters frequently use basting to secure quilt layers before quilting begins. The quilt top, batting, and backing must remain evenly aligned throughout the stitching process.
Without proper stabilization, layers may wrinkle, bunch, or shift while quilting.
Temporary stitching keeps the quilt sandwich flat and smooth, improving quilting accuracy and finish quality.
Securing Trims, Hems, and Decorative Details
Basting stitches are also useful when attaching:
Temporary stitching keeps decorative elements aligned before final sewing begins. This is especially helpful when working with narrow trims or delicate materials that tend to move easily.
Even Basting Stitch vs Running Stitch
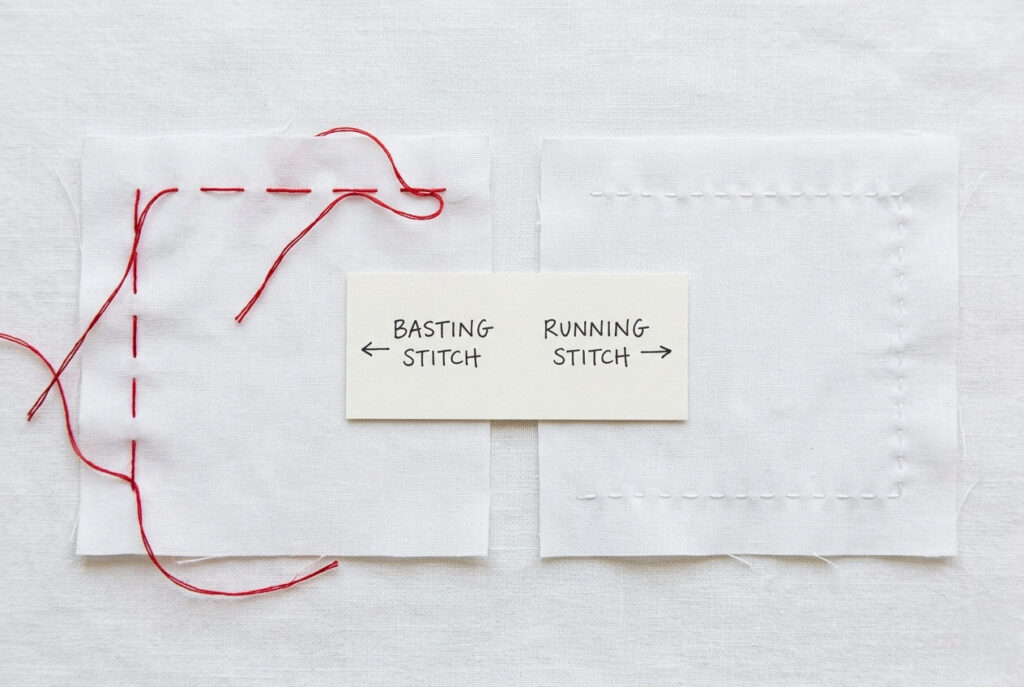
Many beginners confuse an even basting stitch with a running stitch because both use a simple in-and-out hand sewing motion. However, the two stitches serve different purposes.
| Feature | Basting Stitch | Running Stitch |
|---|---|---|
| Purpose | Temporary fabric holding | Decorative or structural sewing |
| Stitch Length | Long | Usually shorter |
| Removal | Designed for removal | Often permanent |
| Main Use | Fabric preparation and fitting | Construction or decoration |
A running stitch may remain part of the finished project permanently, while a basting stitch is intended to be removed after the final seam is sewn.
Understanding the difference helps beginners choose the correct technique for each sewing task.
Also Read: What is Garter Stitch in Knitting? Easy Knitting Explained
Also Read: How to Knit a Moss Stitch: Best Expert Guide
Also Read: What Is Edge Stitch in Knitting? Easy Guide
Removing Basting Stitches Safely
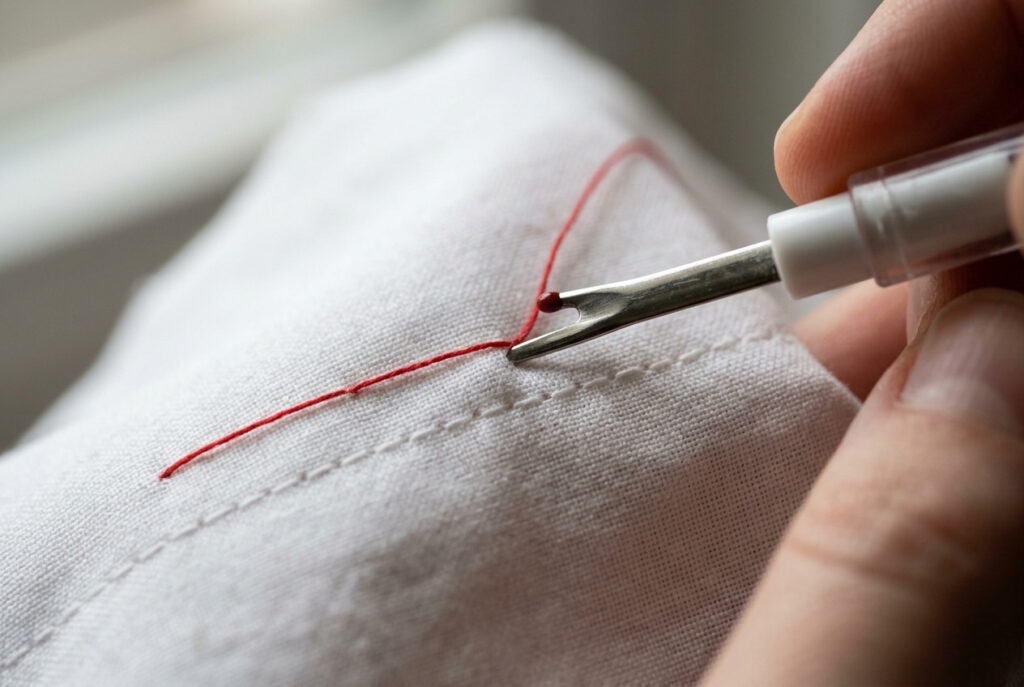
One main advantage of a basting stitch in sewing is that it is designed to be removed easily after permanent stitching. However, removing temporary stitches too quickly or aggressively can damage delicate fabric, distort seams, or cut permanent stitches.
Learning how to remove basting stitches safely helps protect the fabric while keeping the finished project clean and professional.
Use a Seam Ripper Carefully
A seam ripper is one of the safest and most effective tools for removing temporary stitches.
Slide the pointed tip carefully under a few basting stitches at a time and cut the thread gently without pulling the fabric. Work slowly in small sections to reduce the risk of snagging fibers or cutting nearby permanent seams.
This method works especially well for:
When using a seam ripper:
Careful stitch removal helps preserve the fabric and maintain smooth seam lines.
Pull the Thread Gently by Hand
Long, loose basting stitches can sometimes be removed simply by pulling the thread gently from one end of the seam.
This method works best when:
Hold one thread end carefully and ease it along the seam slowly instead of pulling forcefully. Gentle removal prevents thread breakage, bunching, and fabric stress.
Hand removal is especially effective for even basting stitches sewn with long stitch lengths.
Work in Small Sections
For longer seams or delicate materials, remove stitches in smaller sections rather than pulling out the entire thread at once.
Cut the basting thread every few inches with small scissors or a seam ripper, then remove each section individually.
This technique:
Working in sections is especially helpful for silk, chiffon, organza, lace, and loosely woven materials that can shift or fray easily.
Avoid Pulling Too Hard
A common beginner mistake is pulling basting threads too hard.
Excessive force may:
If the thread gets stuck, cut a few more stitches instead of forcing it free.
Slow and careful removal protects both the fabric and the finished stitching.
Also Read: How to Fix a Dropped Stitch: A Complete Guide for Knitters
Remove Basting Only After Permanent Sewing Is Complete
Temporary stitches should stay in place until the permanent seam is fully sewn and checked for accuracy.
Removing basting too early can let fabric layers shift during final stitching.
Before removing the temporary thread, check that:
This helps maintain stability throughout the sewing process.
Reusing Basting Thread
If the thread remains clean and undamaged after removal, it can sometimes be reused for future temporary stitching.
Many experienced sewists reuse basting thread for:
Reusing thread helps reduce waste and keeps sewing supplies organized.
Beginner Tips for Removing Basting Stitches
Removing temporary stitching gets easier with practice. These tips help beginners avoid common mistakes:
With proper removal techniques, basting stitches come out cleanly and safely without damaging the finished project.
Tips and Best Practices for Basting
Good basting habits can make sewing projects easier, more accurate, and far less frustrating. Although a basting stitch in sewing is temporary, the way it is sewn can greatly affect fabric control, seam alignment, fitting accuracy, and the final appearance of the project.
Whether hand- or machine-basting, following a few simple best practices helps create cleaner, more professional results.
Baste Near the Seamline, Not the Raw Edge
In most sewing projects, basting stitches should be placed close to the final seamline rather than directly along the raw fabric edge.
Positioning the stitches near the seamline helps:
The only major exception is gathering fabric, where stitches are sewn closer to the edge so threads can be pulled easily.
Keeping temporary stitches correctly positioned also makes removal easier after permanent sewing is complete.
Use a Contrasting Thread Color
One of the simplest ways to make basting easier is to use thread in a contrasting color.
Bright colors such as blue, red, yellow, and white are easier to see against most fabrics, making stitches easier to remove later.
A matching thread for temporary stitching can make removal difficult, especially on detailed seams or lightweight materials.
Contrasting thread also helps beginners follow the seamline more accurately during sewing.
Keep the Stitch Length Long and Even
Basting stitches should always remain longer than standard sewing stitches.
Long stitches:
For hand basting, stitches are usually ¼ inch to ½ inch long. For machine basting, a stitch length of 4–5 mm works well for most fabrics.
Keeping stitch length even helps the fabric lie flat and prevents uneven tension across the seam.
Avoid Backstitching
Backstitching is commonly used to secure permanent seams, but it should usually be avoided when basting.
Tightly locking the thread makes temporary stitches harder to remove and may damage delicate fabric.
Instead, leave long thread tails at the beginning and end of the seam. Loose thread ends keep basting removable while holding the fabric securely for temporary construction.
Press Fabric Before Basting
Wrinkled or uneven fabric affects seam accuracy and creates distorted shaping during sewing.
Before basting:
Properly preparing fabric helps temporary stitches sit evenly and improves sewing accuracy.
Combine Basting With Pins or Clips When Needed
In some sewing projects, combining pins with basting creates additional stability.
Pins or sewing clips hold bulky sections temporarily, while basting secures the seamline more evenly.
This combination works especially well for:
Using both methods together often improves control in difficult sewing sections.
Re-Baste When Adjustments Are Needed
One of the biggest advantages of basting is flexibility. If the fabric shifts or the fit needs adjustment, simply remove the temporary stitches and baste again.
Re-basting is a normal part of garment construction, tailoring, and fitting. Even experienced sewists often adjust temporary seams several times before final stitching.
Because basting is temporary, it allows corrections without damaging the project.
Test Delicate Fabrics First
Lightweight or delicate fabrics may show temporary needle marks after stitching.
Testing the stitch length and tension on scrap fabric first helps prevent visible damage and allows adjustments before sewing the actual project.
This is especially important for:
Testing first improves both fabric safety and sewing confidence.
Use Hand Basting for Detailed Sewing Work
Machine basting is faster, but hand basting often provides better precision for detailed sewing tasks.
Hand basting is especially useful for:
This extra control helps maintain accuracy where precision matters most.
Remove Basting Stitches Promptly
Temporary stitches should be removed soon after the permanent seam is completed.
Leaving basting stitches in place too long may:
Careful and timely removal keeps the finished project looking clean and polished.
Beginner Tips for Better Basting Results
If you are new to sewing, these habits can improve your basting technique quickly:
With practice, basting becomes one of the most valuable techniques for improving sewing accuracy, fabric control, and construction quality.
Hand Basting vs Machine Basting
Both hand basting and machine basting offer advantages depending on the sewing project, fabric type, and precision required. Many experienced sewists use both techniques, depending on the situation and the control needed during construction.
| Hand Basting | Machine Basting |
|---|---|
| Offers greater control and precision | Faster for long seams and large projects |
| Better for delicate or slippery fabrics | Efficient for everyday sewing |
| Easier for curves, corners, and detailed work | Provides consistent stitch length |
| Ideal for garment fitting and couture sewing | Helpful for quilting and gathering fabric |
| Allows careful adjustment during construction | Saves time during repetitive sewing tasks |
Hand basting is often preferred for detailed sewing and delicate materials. Machine basting works well for quick, temporary stitching on larger projects. Using the right method can improve sewing accuracy, fabric control, and finishing quality.
Also Read: The Best Knitting Machines For Crafters
Also Read: Best Knitting Machines for Hats 2025: Buyer’s Guide
Common Beginner Mistakes
Learning how to use a basting stitch in sewing takes practice, and beginners often make common mistakes. Understanding these issues early can improve sewing accuracy and help prevent frustration later.
Pulling the Stitches Too Tight
One of the most common beginner mistakes is pulling the thread too tightly while basting.
Basting stitches should hold the fabric gently without creating tension. Tight stitches can cause:
Temporary stitching should remain loose enough to remove easily after permanent sewing is complete.
Using Stitches That Are Too Short
Short stitches act like permanent seams and are harder to remove later.
A proper basting stitch uses longer lengths so the fabric stays flexible and thread can be removed quickly without damage.
For machine basting, a stitch length of 4–5 mm usually works best. Hand basting stitches are typically ¼ to ½ inch long.
Backstitching Automatically
Many beginners instinctively backstitch at seam ends because it is standard for permanent sewing.
However, backstitching locks the temporary thread in place and makes removal much more difficult.
Instead, leave long thread tails at both ends of the seam to keep the stitches removable.
Using Matching Thread
Using thread that matches the fabric may seem good, but it often makes temporary stitches hard to see and remove.
Contrasting thread colors are much easier to identify during removal and help beginners follow the seamline more accurately while sewing.
Forgetting to Remove Basting Stitches
Temporary stitches are designed to be removed after the permanent seam is finished.
Beginners sometimes overlook small sections of basting thread, especially around gathers, zippers, or layered seams.
Checking the finished project carefully helps prevent visible temporary stitching from remaining in the final garment.
Skipping Basting Entirely
Many beginners skip basting because it seems unnecessary or time-consuming. Avoiding it often leads to:
Although basting adds a step, it often saves time by preventing sewing mistakes.
Also Read: Best Beginner Knitting Projects for New Knitters
Also Read: Top 10 Best Knitting Patterns for Beginners: Easy Guide
Is Basting Always Necessary?
Not every sewing project requires basting.
Simple projects with stable cotton may sew well using only pins or clips. However, basting is valuable when working with:
Many experienced sewists consider basting one of the most underrated sewing techniques because it improves fabric control, sewing precision, and overall finishing quality.
FAQs: What Is a Basting Stitch in Sewing?
Final Thoughts
Understanding what a basting stitch in sewing is and how to use it confidently can improve the quality of your finished pieces. Whether you’re sewing a simple skirt, a fitted dress, or a lined jacket, taking a few minutes to baste by hand or machine will save you time, reduce frustration, and help you sew more like a seasoned seamstress.
Including this small temporary step in your routine means you’re not just following a technique, you’re practicing it. You’re building a habit of careful, thoughtful construction that every serious knitter and sewist appreciates.