How to Sew Elastic in Waistband: 3 Easy Methods
Sewing an elastic waistband can make a handmade skirt, pair of shorts, or comfortable trousers fit beautifully without complicated closures. Once you understand where to place the elastic, how much to use, and which stitch works best, the process becomes much easier.
I have sewn elastic waistbands on various fabrics over the years and found the biggest difference comes from choosing the right elastic and testing the fit before joining the ends. A small adjustment at this stage can prevent the waistband from feeling too tight or falling loose later.
In this guide, I’ll show you how to sew elastic in waistband using three practical methods. You’ll learn how to make a traditional casing, attach elastic directly to fabric, and create a neat flat elastic waistband.
Key Takeaways
What Is an Elastic Waistband and Why Use It?
An elastic waistband uses elastic to hold a garment comfortably at the waist. Unlike a zipper or button closure, it expands as you move and contracts to stay in place.
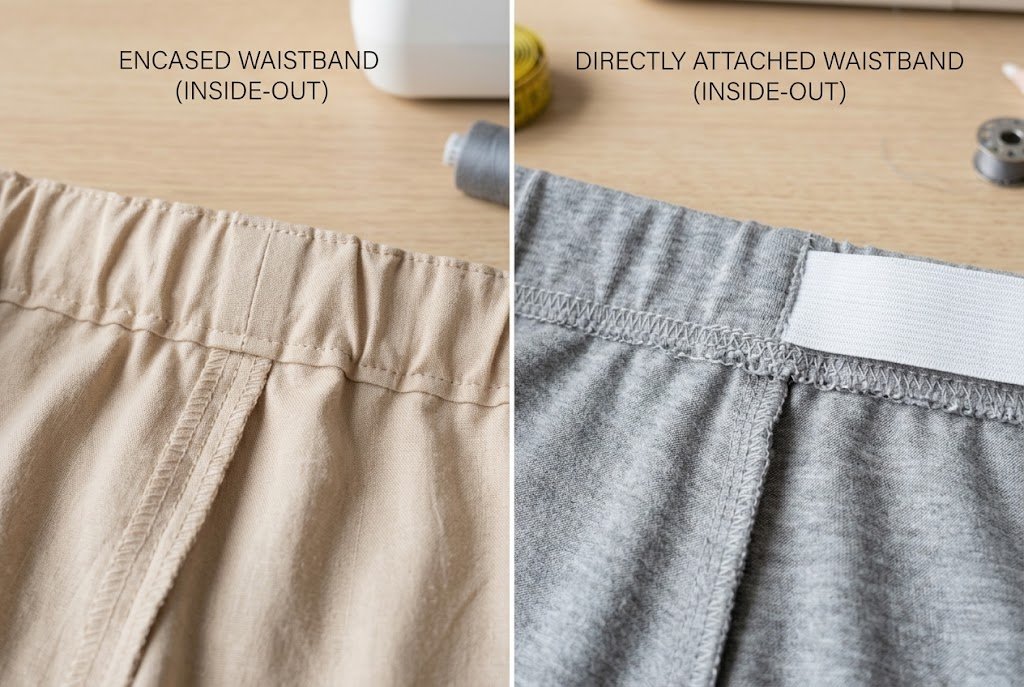
You can hide the elastic inside a fabric casing or sew it directly to the garment. Each method suits different fabrics and finishes.
An encased elastic waistband looks clean because the elastic stays inside a folded fabric tunnel. It works well for skirts, pajama pants, children’s clothes, dresses, and casual trousers.
A directly attached waistband keeps the elastic closer to the fabric surface. This method creates a flatter finish and works well with knit garments, athletic clothing, shorts, and some loungewear.
For beginners, an elastic waistband is a useful way to practice accurate sewing without complicated closures. Once the basic technique feels familiar, you can apply it to many everyday garments.
Also Read: Best Sewing Machine for Apparel: Top 10 Picks
Tools and Materials You’ll Need
You do not need many sewing supplies for an elastic waistband. Gather these:
Also Read: 10 Best Thread for Sewing: Ultimate Guide 2026
Choose the Right Elastic
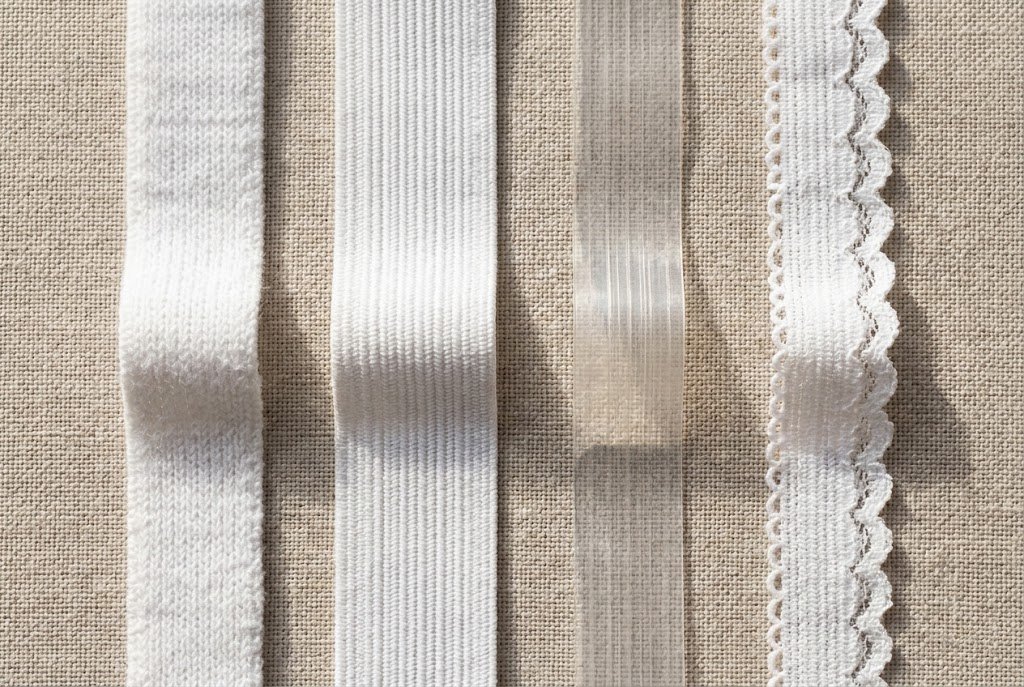
Several elastic types work for waistbands, but they behave differently.
When choosing elastic, check its width and recovery. Good recovery means the elastic returns close to its original size after stretching. The right mix of stretch, recovery, width, and softness affects how the finished waistband feels.
How to Measure and Cut Elastic for a Waistband
Getting the length right is one of the most important parts of the process. Elastic that is too short can dig into the waist, while elastic that is too long can leave the garment loose.
Start by measuring around the part of the body where the finished waistband will sit. Keep the tape comfortably against the body without pulling it tight.
A useful starting point is:
Comfortable waist measurement − a small amount for negative ease + enough overlap to join the elastic
The exact amount of negative ease depends on the elastic’s stretch, recovery, width, and the garment’s design. Use any formula as a starting point, not a fixed rule.
How to Measure Elastic for a Comfortable Waistband
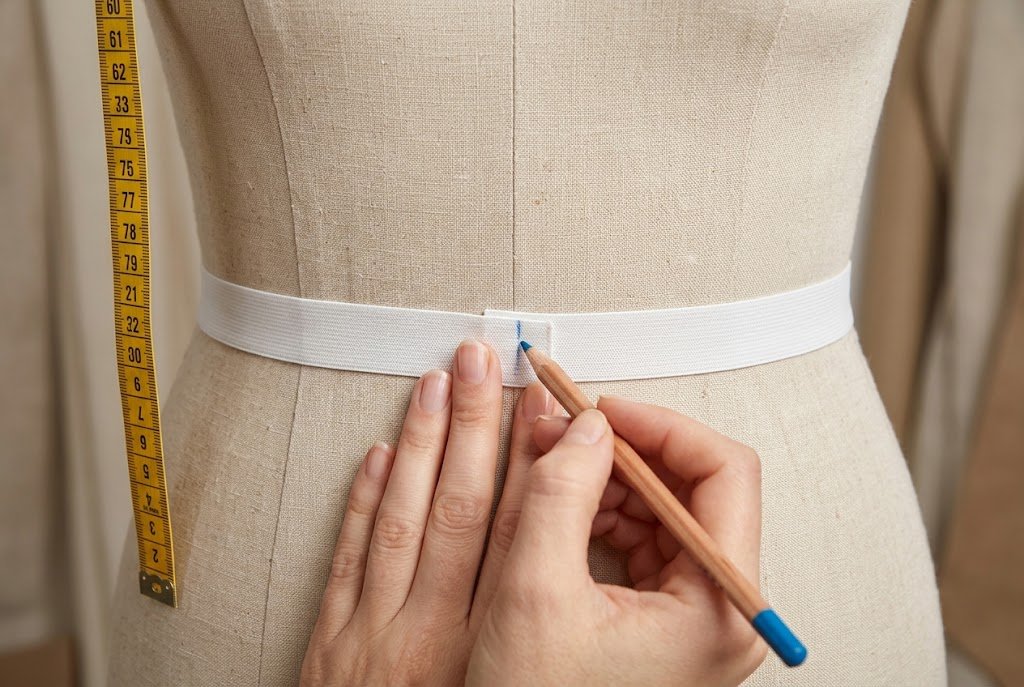
Wrap the elastic around the waist and stretch it until it feels comfortably secure. Breathing, sitting, and moving should feel natural without the elastic digging into the skin.
Mark the point where the ends meet. Then add enough overlap to join the ends securely. About 1 inch often provides a practical joining area, but follow the elastic and waistband requirements.
Before cutting expensive elastic, test a short piece around the waist. This check reveals more than a generic measurement.
Also Read: Best Sewing Scissors: Top Picks 2026
Mark the Elastic in Quarters
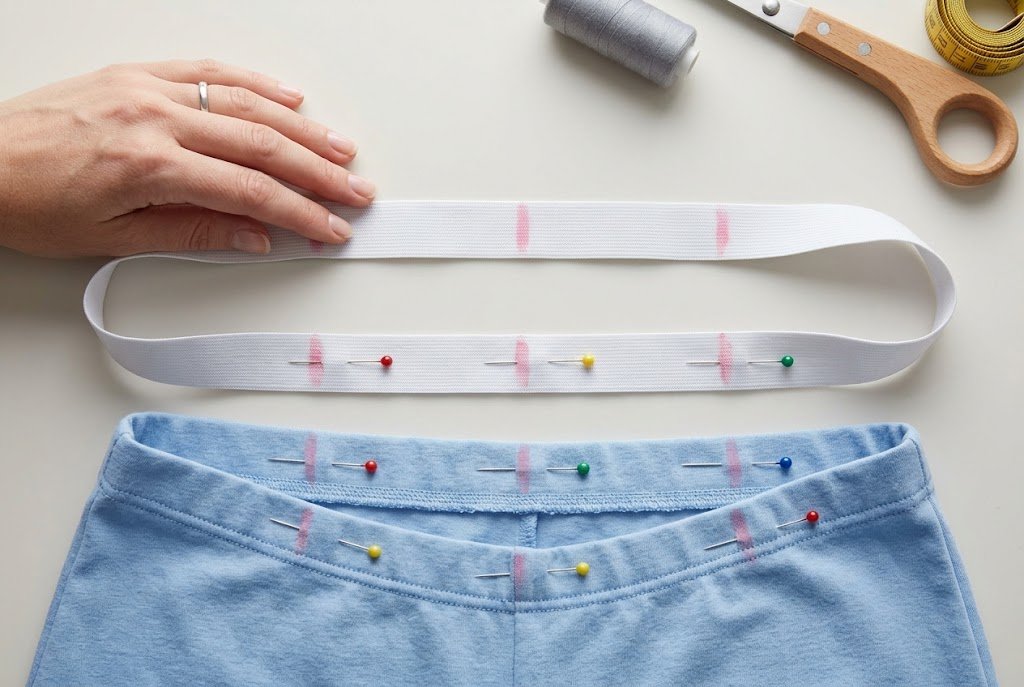
After cutting the elastic, fold it in half and mark both ends. Fold it in half again and mark the remaining points. You now have four evenly spaced marks.
Do the same with the garment waistline, marking the center front, center back, and both side points.
Match the corresponding marks when sewing. These quarter points help distribute the gathers evenly and make it easier to control the elastic as you work.
How to Sew Elastic in Waistband
Three practical ways to sew elastic into a waistband are using a fabric casing, attaching the elastic directly to the fabric, or creating a flat elastic waistband. Your choice depends on the fabric, garment design, and desired finish.
Before starting, measure the elastic for a comfortable fit. Mark both the elastic and waistband into quarters. These marks help distribute the stretch evenly and keep the waistband balanced.
Method 1: Encased Elastic Waistband
An encased elastic waistband tutorial is a great start for beginners. The elastic stays hidden inside a fabric casing, giving the garment a neat finish and allowing the waistband to stretch comfortably.
Step 1: Finish the Top Edge
Finish the raw top edge if the fabric requires it. Use a zigzag stitch, overlock stitch, or another suitable edge finish.
Press the edge flat before creating the casing.
Step 2: Fold and Press the Casing
Fold the upper edge toward the wrong side of the garment. Make the casing wide enough for the elastic to pass through and move comfortably.
As a general guide, allow the elastic width plus a small extra room. Avoid making the casing exactly the same width as the elastic because it needs space to move.
Press the fold carefully to keep the casing even around the waistband.
Also Read: 10 Best Iron for Sewing: Top-Rated Picks 2026
Step 3: Stitch the Casing
Sew along the lower edge of the folded fabric, keeping the stitching line consistent.
Leave a 1–2 inch opening for inserting the elastic. Backstitch both ends to keep the seam secure while threading the elastic.
Do not close the opening yet.
Step 4: Insert the Elastic
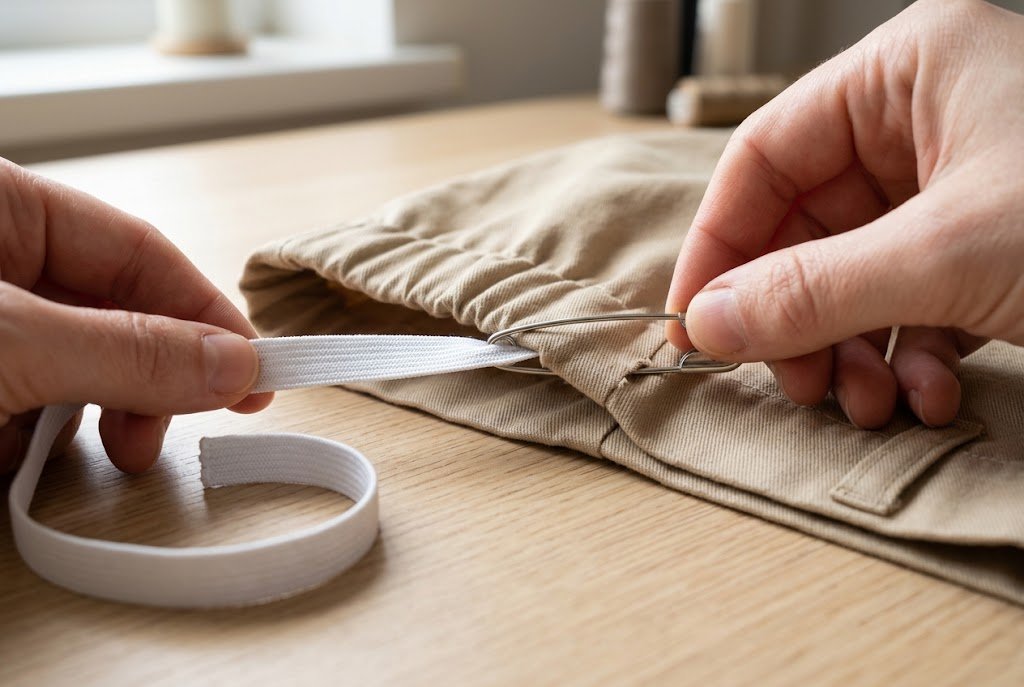
Attach a safety pin or bodkin to one end of the elastic. Feed it through the casing while gently gathering the fabric.
Hold the other end so it does not disappear inside the casing. Guide the elastic around the waistband and bring the end back through the opening.
Before joining the ends, check that the elastic has not twisted.
Step 5: Join the Elastic Ends
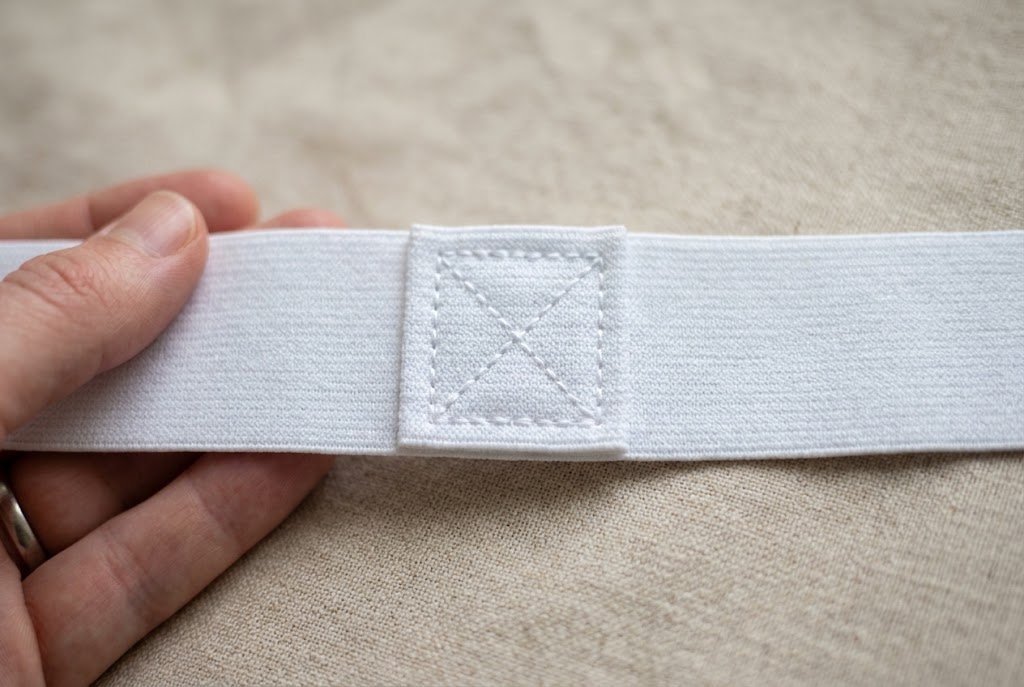
Overlap the elastic ends by about 1 inch or follow the joining allowance recommended for the elastic.
Secure the overlap with a sturdy zigzag stitch or a small rectangular reinforcement. For wider elastic, a box or box-with-an-X stitch can provide a secure join.
Avoid relying on a single weak line of stitching because the joint will stretch during wear.
Step 6: Close the Opening
Pull the joined elastic fully inside the casing. Check the waistband again to ensure the elastic stays flat.
Close the opening with a straight stitch, matching the existing casing seam closely.
Gently stretch the waistband several times to distribute the gathers evenly. If the elastic tends to twist inside the casing, stitch vertically through the casing at the side seams to keep it in place.
This method works well for skirts, pants, shorts, dresses, and other garments where you want the elastic completely hidden.
Method 2: Elastic Waistband Without a Casing
An elastic waistband without casing attaches the elastic directly to the garment instead of creating a separate fabric tunnel. This method reduces bulk and works particularly well with knit garments, casual shorts, skirts, joggers, and some children’s clothing.
How Do You Attach Elastic to a Waistband?
First, join the garment’s waist seam if the pattern requires. Then mark both the waist opening and elastic into four equal sections.
Step 1: Mark the Elastic and Waist
Divide the elastic loop into quarters and mark each point with a pin or fabric marker. Do the same with the garment waist.
Matching these points helps distribute the gathers evenly as you sew.
Step 2: Pin the Elastic to the Inside
Place the elastic against the wrong side of the fabric. Match the quarter marks and secure the elastic with clips or pins.
Keep the fabric relaxed. The elastic should stretch to fit the space between the marks without pulling the fabric.
Also Read: How to Read a Sewing Pattern? Easy Step-by-Step Guide
Also Read: What Is a Basting Stitch in Sewing? Easy Guide
Step 3: Stretch and Sew
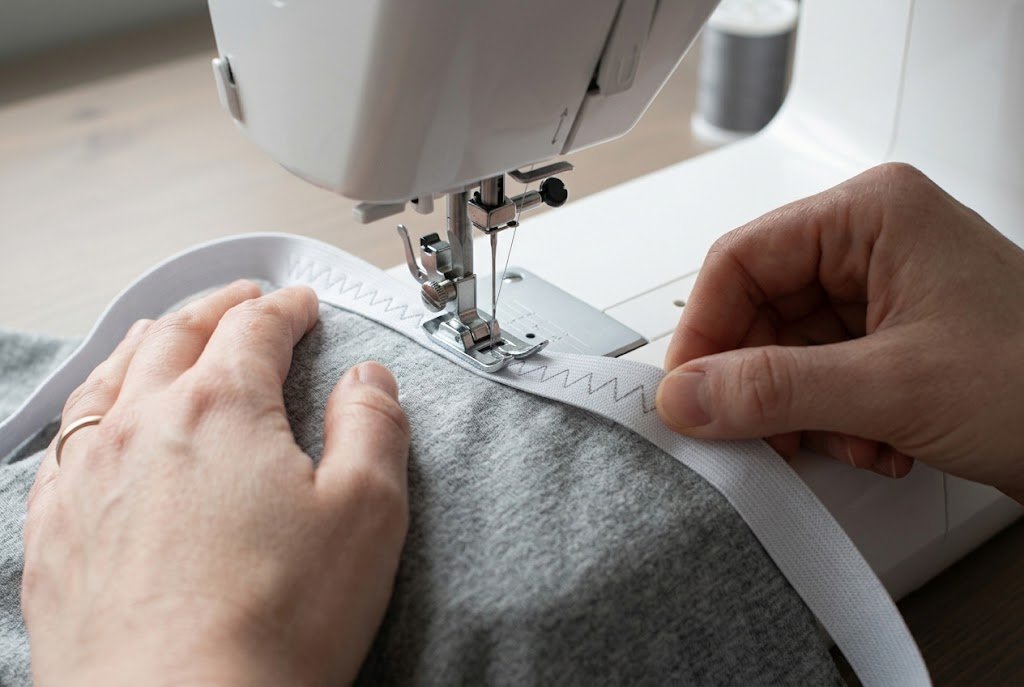
Use a zigzag, three-step zigzag, or suitable stretch stitch. Gently stretch the elastic between the marked sections while keeping the fabric flat underneath.
Keep the stretch consistent around the waistband. Pulling the elastic too much can cause excessive gathers or wavy stitching.
If using a serger, follow the machine manufacturer’s recommendations for elastic and stretch fabrics.
Also Read: How to Replace a Sewing Machine Needle? Easy Guide
Step 4: Fold and Finish the Waistband
After attaching the elastic, fold it inside the garment to hide the elastic and raw edge.
Topstitch around the waistband while gently stretching the elastic as needed. Keep the stitching even to maintain a smooth finished edge.
This method creates a soft, flexible finish without the extra fabric required for a traditional casing. It is particularly useful for knit fabric or garments where you prefer a lower-profile waistband.
Method 3: Flat Elastic Waistband
A flat elastic waistband gives garments a smooth appearance with less bulk than some traditional casings. It works well for trousers, palazzo pants, skirts, and fitted casual garments.
Instead of threading the elastic through a fabric tunnel, attach it directly to the fabric and then fold the waistband into position.
Step 1: Prepare the Elastic and Waistband
Join the elastic into a loop and mark both the elastic and garment waist in quarters. Matching these points distributes the stretch evenly around the waistband.
Step 2: Attach the Elastic
Place the elastic against the wrong side of the fabric, matching the quarter marks. Use a zigzag or stretch stitch to attach the elastic, gently stretching it between the marks.
Keep the fabric flat as you sew. Avoid stretching it, as this can make the waistband wavy.
Step 3: Fold the Waistband
Fold the fabric over the elastic toward the inside of the garment. Keep the elastic flat inside the fold and press gently if the fabric permits.
Step 4: Secure the Fold
Stitch along the lower edge of the folded waistband to secure the elastic. Use a zigzag, stretch stitch, or another suitable stitch for the fabric.
Keep the stitching line even and avoid catching the elastic unevenly. Sew a second row if needed for extra stability.
A flat elastic waistband is useful when you want the waistband to sit smoothly under a shirt or lightweight top. For wide-leg trousers or heavier fabrics, choose an elastic with enough width and recovery to support the garment without feeling restrictive.
How to Stop Elastic from Twisting or Rolling
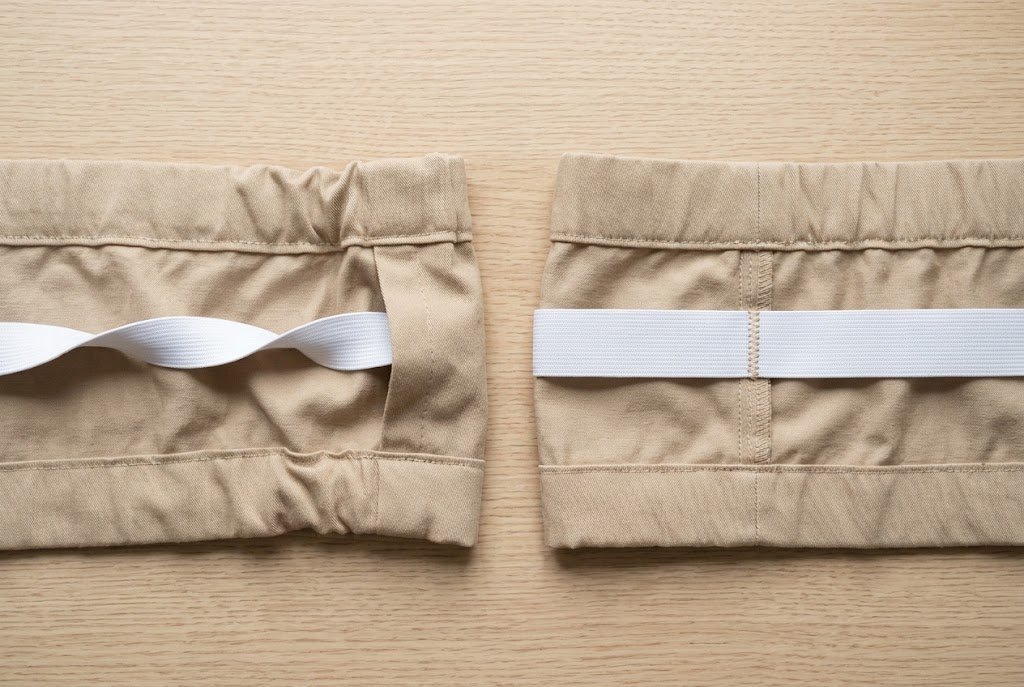
Twisted or rolled elastic can make a waistband uncomfortable and cause the garment to sit unevenly. The problem is especially common when elastic is enclosed inside a casing.
Several simple habits can help prevent it. Start by choosing elastic with enough width and stability for the garment. Non-roll elastic keeps the waistband flat.
When inserting elastic through a casing, keep it aligned as you move it through the fabric tunnel. Before closing the opening, feel the waistband to make sure the elastic hasn’t twisted or turned over.
If the construction allows it, sew a short vertical line through the waistband at each side seam. You can also add stitching at the center front and center back when appropriate. These anchor points help keep the elastic in position while still allowing it to stretch.
For wider casings, stitching along the upper and lower edges can further control the elastic. Choose a stitch that suits the fabric and does not restrict the waistband’s movement.
When considering how to stop elastic from twisting in waistband, focus on four things:
These details help the waistband stay comfortable and stable while you wear it.
Best Elastic for Different Projects
The right elastic depends on the fabric, garment design, and the stretch and support you need. Elastic that is comfortable in a lightweight skirt may not provide enough stability for heavier trousers.
Elastic Waistband for Pants and Trousers
Woven non-roll elastic works well for many pants because it provides stable support while allowing the waistband to stretch. Choose a width that fits the waistband design and feels comfortable when sitting or moving.
For heavier trousers, wider elastic distributes pressure more evenly than narrow elastic. Always check that the elastic fits comfortably inside the planned waistband or casing.
Sew Elastic Waistband Joggers, Shorts, and Palazzo Pants
Joggers and casual shorts often work well with soft knit or woven elastic. The choice depends on whether you want a softer stretch or a firmer waistband.
Palazzo pants also work well with soft woven or knit elastic. A wider waistband provides useful support, especially with heavier garment fabric.
Elastic Waistband on Knit Fabric
Soft knit elastic pairs well with jersey and other stretch fabrics because it moves comfortably with the garment. Avoid elastic firmer than the fabric requires, as it can affect how the waistband stretches and sits.
When sewing elastic to knit fabric, use a zigzag or suitable stretch stitch so the seam can move with the garment.
Quick Guide to Elastic Types
| Garment or Fabric | Suitable Elastic | Main Consideration |
|---|---|---|
| Lightweight skirts | Knit elastic | Softness and flexibility |
| Everyday pants | Woven non-roll elastic | Stability and support |
| Knit shorts | Knit or soft woven elastic | Comfortable stretch |
| Joggers | Knit or medium-weight woven elastic | Comfort during movement |
| Palazzo pants | Soft woven or knit elastic | Support without excessive bulk |
| Lightweight knit dresses | Soft knit or clear elastic | Flexibility and low bulk |
| Delicate garments | Lingerie or buttonhole elastic | Lightweight construction |
When choosing how wide an elastic waistband should be, consider the garment pattern, elastic type, casing size, and needed support. Wider elastic can distribute pressure more evenly, but it also needs enough waistband space to sit comfortably without creating unnecessary bulk.
For any project, test a short length of elastic before sewing the final waistband. Stretch it around the body, sit, and move normally. This test shows if the elastic feels too firm, too loose, or just right for the garment.
Troubleshooting Common Elastic Waistband Problems
Even a well-planned elastic waistband can develop problems during sewing or after wear. Most issues stem from elastic length, uneven tension, unsuitable elastic, or construction problems.
The Waistband Feels Too Tight
Check the elastic length before altering the fabric. If the elastic feels uncomfortable around the waist, replace it with a slightly longer piece and test the fit before joining the ends.
Don’t fix a short elastic by stretching it more while sewing. Excessive tension can create a tight waistband and cause uneven gathers.
The Waistband Feels Too Loose
Check the finished waistband and the elastic’s recovery. If the elastic stays stretched or does not return well after use, a firmer or shorter piece may be better.
If the fabric has too much ease, adjust the elastic length instead of trying to gather the fabric more tightly during sewing.
The Elastic Twists Inside the Casing
If the elastic twists, open the casing and straighten it before closing the waistband. Check the elastic around the entire waist to make sure it lies flat.
To prevent the problem from returning, anchor the elastic at the side seams or other suitable points. Always check for twists before closing the casing completely.
The Casing Looks Wavy or Puckered
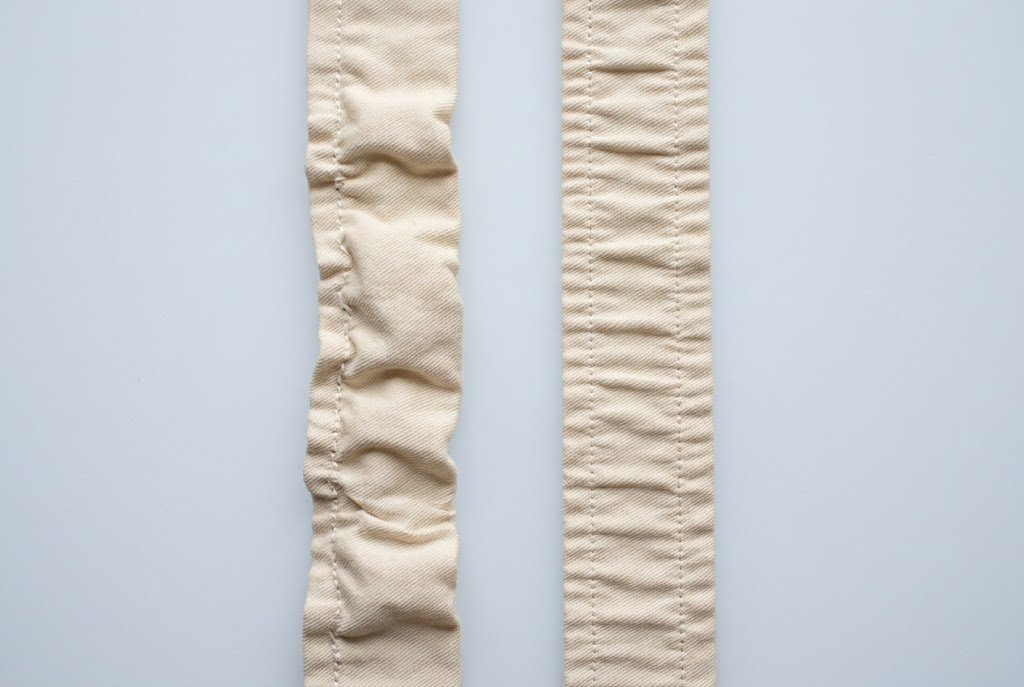
Uneven gathers, excessive elastic tension, or pulling the fabric while sewing can cause the casing to look wavy.
Distribute the gathers evenly around the waistband and keep the fabric relaxed while sewing. Check that the casing is wide enough for the elastic to move comfortably, then press the finished waistband gently.
The Elastic Digs Into the Skin
The elastic may be too short, narrow, or firm for the garment. Try a wider or softer elastic and test it around the waist before attaching it permanently.
Comfort is especially important for garments worn long periods. The waistband should hold the garment securely without causing uncomfortable pressure.
Also Read: Why Does My Sewing Machine Keep Jamming? Easy Fixes
Final Tips for a Professional-Looking Elastic Waistband
A comfortable elastic waistband mainly depends on accurate measuring, suitable elastic, and controlled sewing.
If you are new to elastic waistbands, start with a simple skirt or pair of shorts. These projects offer a straightforward way to practice measuring, joining, inserting, and securing elastic.
Take your time during fitting. A waistband that lies flat and feels comfortable usually results from careful preparation rather than complicated sewing.
Also Read: 10 Best Sewing Books for Beginners: Top Picks 2026
Conclusion: how to sew an elastic waistband
Learning how to sew an elastic waistband becomes easier once you understand the basic construction. A traditional casing hides the elastic, while direct attachment creates a flatter finish. A flat elastic waistband works well for trousers, skirts, and wide-leg garments.
The most important part is careful preparation. Measure the elastic for comfort, test its tension, mark the quarter points, and keep the elastic flat while sewing.
Once you become familiar with these techniques, you can adapt them to many everyday garments, including skirts, shorts, trousers, joggers, and dresses.